

Standard seam allowance by pattern company and region
| Pattern source | Seam allowance | Included on the pattern? |
|---|---|---|
| US Big 4 (Simplicity, McCall's, Butterick, Vogue) | 5/8 in (1.5 cm) | Yes |
| UK and EU commercial envelopes | 1.5 cm (5/8 in) | Yes |
| Burda Style magazine | add 1 to 1.5 cm (3/8 to 5/8 in); hems 2 to 4 cm (3/4 to 1 1/2 in) | No |
| OTTOBRE design magazine | add 1 to 1.5 cm (3/8 to 5/8 in); hems 2 to 4 cm | No |
| Japanese pattern books and magazines | add 1 to 1.5 cm (3/8 to 5/8 in); hems 2 to 4 cm | No |
| Burda envelope patterns | read the envelope: this varies by pattern | Check each pattern |
| Indie woven patterns | 1 cm, 1.5 cm, 3/8 in, 1/2 in or 5/8 in | Usually yes; each designer states it |
| Knit patterns drafted for an overlocker | 6 mm to 1 cm (1/4 to 3/8 in) | Yes |
| Quilting patterns | 1/4 in (0.75 cm in metric patterns) | Yes, built into every cut size |
The golden rule sits above every row of that table: read the pattern's own statement. It is printed on the envelope, the instruction sheet or the first page of a PDF, and it always wins over any chart, including this one. Even within one Big 4 pattern, a neckline or collar piece can carry a narrower allowance than the rest, and when it does the pattern says so on that piece.
Seam allowances in quilting
Quilters work to a smaller, stricter allowance, because a quilt is dozens or hundreds of seams side by side, and every fraction repeats.
| Use | Imperial | Metric | Notes |
|---|---|---|---|
| Machine and hand piecing | 1/4 in | 0.75 cm (some patterns use 0.7 cm) | The quilting standard |
| Scant quarter inch | 1/4 in minus one or two thread widths | 0.75 cm minus about 1 mm | Makes up for the fold of a pressed seam |
| English paper piecing (EPP) | 3/8 in (some use 1/4 in) | 1 cm (or 0.75 cm) | Fabric folded over paper templates |
| Applique turn under | 3/16 to 1/4 in | 0.5 cm | Needle turn and prepared edge |
| Hawaiian applique turn under | 1/8 in | 0.3 cm | Narrow turn under for intricate one piece designs |
| Rag quilt exposed seam | 1/2 to 5/8 in | 1.25 to 1.5 cm | Seams sewn to the front and fringed |
| Binding attachment | 1/4 to 3/8 in | 0.75 to 1 cm | Matches the binding width |
Seam allowance conversion: inches to mm and cm
| Inches | Exact mm | Rounded | Metric convention you will meet |
|---|---|---|---|
| 1/8 in | 3.175 mm | 3 mm | Hawaiian applique turn under 0.3 cm; grading and trimming |
| 1/4 in | 6.35 mm | 6 mm | Overlocker knits 6 mm; quilting uses 0.75 cm |
| 3/8 in | 9.525 mm | 10 mm | 1 cm, the favourite indie and EPP allowance |
| 1/2 in | 12.7 mm | 13 mm | 1.25 cm for rag quilt seams |
| 5/8 in | 15.875 mm | 16 mm | 1.5 cm, the metric dressmaking standard |
| 3/4 in | 19.05 mm | 19 mm | 2 cm, the narrow end of hem allowances |
| 1 in | 25.4 mm | 25 mm | 2.5 cm |
One inch is exactly 25.4 mm by international agreement, so every value in the "Exact mm" column is precise. The metric conventions are not conversions: they are their own round numbers, chosen because they are easy to sew. That difference matters more in quilting than in dressmaking, and the next sections show exactly why. To convert any allowance in one tap, use the free seam allowance converter.
What is a seam allowance?
Every pattern piece has two edges that matter: the cutting line, where your scissors or rotary cutter go, and the seam line, where the stitches go. The strip of fabric between them is the seam allowance. When two pieces are placed right sides together and stitched on the seam line, the allowances end up inside the garment or quilt, out of sight.
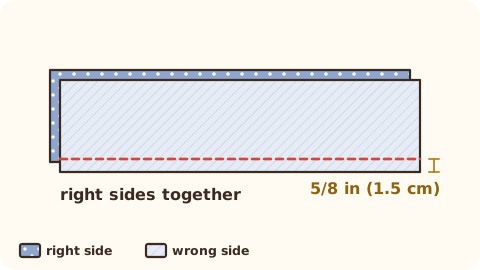
The allowance is not waste. It gives the seam strength so it does not pull out under stress, room to finish the raw edges, room to press, and, in garments, a little fabric you can let out for fit.
Why is the standard seam allowance 5/8 in?
Because 5/8 in does every job a garment seam needs. It is wide enough to press open flat, wide enough to zigzag or overlock each edge, and wide enough to let out a side seam if a fitting shows you need a little more room. It is also exactly the width that classic seam constructions use. A French seam is sewn at 1/4 in, trimmed, turned and sewn again at 3/8 in: 1/4 + 3/8 = 5/8 in. In metric the same seam is 6 mm + 9 mm = 15 mm. The numbers are not an accident; the allowance was built around the techniques.
Is 1.5 cm the same as 5/8 in?
Close enough for garments, and that is why metric pattern companies chose it. 5/8 in is 15.9 mm (15.875 mm exactly), so 1.5 cm is 0.875 mm narrower. If you sew a 5/8 in pattern at 1.5 cm, each seam adds 1.75 mm to the circumference of the garment (0.875 mm on each side of the seam). A skirt with four vertical seams grows by 7 mm, about 1/4 in, which disappears into the wearing ease. Your needle plate is almost certainly marked in both, so sew the one the pattern names.
Quilting is a different story, as you will see below.
Does the pattern include seam allowance?
Three checks settle it in under a minute.
- Read the envelope or the instructions. Look for "seam allowance included" or "5/8 in (1.5 cm) seam allowance included" on the back of the envelope, the instruction sheet or the first page of the PDF.
- Look at the edge of the pieces. Single size patterns often print a dashed stitching line inside the cutting line; if you see one, the allowance is included. Multi size patterns usually show only the nested cutting lines, with the allowance hidden inside them.
- Check the source. Burda Style magazine, OTTOBRE and Japanese pattern books print the net pattern, the exact seam line, and ask you to add allowance as you trace. Burda envelope patterns vary, so read each one. Indie designers state their own value, often 1 cm or 3/8 in.
How do you add seam allowance to a pattern without it?
- Trace your size onto tracing paper, using a ruler for straight lines and a curve for the rest.
- Copy every marking: grainline, notches, dots, fold lines and the piece name.
- Add the allowance outside the traced line: 1 to 1.5 cm (3/8 to 5/8 in) on seams and 2 to 4 cm (3/4 to 1 1/2 in) at hems, or exactly what the pattern asks for. Use a seam gauge or a double tracing wheel to keep it even all the way round.
- Add nothing on a fold line, and nothing on edges the instructions say will be bound or finished at the net line.
- Square off the corners: extend both new allowance lines until they meet, then fold the paper along the seam line and trim, so the allowance has the right shape when the seam is sewn.
- Walk the seams: lay matching edges together and check that their lengths agree between the notches.
- Write the allowance on every piece. Future you will be grateful.
Our tip: when you add your own allowance, choose 1.5 cm on side seams (room to fit) and 1 cm on necklines, armholes and collars (less to trim). Mixed allowances are fine, as long as each piece is labelled.
How to change a 5/8 in seam allowance to 3/8 in, and why you might
Plenty of sewists reduce the allowance on some or all seams. Good reasons:
- Curves and enclosed seams: necklines, armholes, collars, cuffs and facings are trimmed after sewing anyway. Sewing them at 3/8 in (1 cm) saves the trim and makes the curve easier to steer.
- Overlocker construction: a four thread overlocker sews and trims in one pass. Knits drafted for an overlocker already use 6 mm to 1 cm (1/4 to 3/8 in).
- Matching another system: if you mostly sew indie patterns at 1 cm, you may want your Big 4 patterns to match.
How to do it without changing the fit:
- Change the paper, not the stitching. Trim exactly 1/4 in (6 mm) off the cutting line of both pieces that meet at a seam, so the seam line stays where the designer put it.
- Change both sides of every seam you alter. A sleeve at 3/8 in sewn into an armhole at 5/8 in will not fit.
- Move the notches in with the edge.
- Keep 5/8 in (1.5 cm) on side seams and centre back seams of fitted garments until you have made the pattern once. That extra width is your fitting insurance.
And if you only want a seam a little looser or tighter, there is a gentler route: Simplicity's own guidance is that on most fabrics you can stitch as much as 1/4 in (6 mm) closer to the cut edge of a 5/8 in allowance, which lets you fine tune fit on the go.
Grading, clipping and notching: what to do with the allowance after sewing
A 5/8 in allowance is perfect while you sew and too bulky once a seam is turned to the inside. Three small cuts fix that.
- Grading layers the allowances so they do not form a ridge. On an enclosed curve such as a collar or a faced neckline, trim one allowance to 1/4 in (6 mm) and the other to 1/8 in (3 mm). Keep the wider one against the outside of the garment.
- Clipping lets an inward (concave) curve spread. Clip straight into the allowance every 3/8 to 1/2 in (1 to 1.3 cm), stopping a thread or two short of the stitches.
- Notching removes bulk from an outward (convex) curve. Cut small V shapes so the allowance folds flat without lumps.
- Corners are trimmed diagonally across the point, about 1/8 in (3 mm) from the stitches, so they turn out sharp.
One more cut people overdo: pattern notches. When you mark notches by snipping, cut no more than 3 mm (1/8 in) into the seam allowance. A deeper snip can show on the outside once the seam is sewn, and on a reduced 3/8 in allowance it can reach the seam line itself.
The quilter's 1/4 inch seam allowance
In quilting the allowance is 1/4 in, and it is built into every cut size. That is why every quilting square is cut finished size + 1/2 in: each of the two opposite edges loses 1/4 in to a seam. A 4 in finished square is cut 4 1/2 in. A 12 in finished block measures 12 1/2 in before it is sewn into the quilt. In metric the convention is 0.75 cm, so a square is cut finished + 1.5 cm: a 10 cm finished square is cut 11.5 cm.
Why quilters never mix 1/4 in and 0.75 cm
Here is the worked example that shows why. 1/4 in is 6.35 mm, and 0.75 cm is 7.5 mm. Cut a square 4 1/2 in (114.3 mm) from an imperial pattern but sew it with a 0.75 cm seam, and it finishes at 99.3 mm instead of 4 in (101.6 mm). Ten of those across a quilt come out 23 mm short, just under 1 in. The border is now too long, and the quilt will never lie flat.
So a metric quilt is planned in metric from the start, with finished sizes in round centimetres and a 0.75 cm seam, and an imperial quilt is planned in inches with 1/4 in seams. Pick one system per project and stay in it, cut list to binding.
The quarter inch accuracy test
A quarter inch foot gets you close. This test tells you whether you are exactly right.
- Cut three strips 1 1/2 x 3 1/2 in (4 x 9 cm in metric).
- Sew them together along the long edges with your quarter inch seam (0.75 cm in metric).
- Press both seams away from the centre strip.
- Measure. The unit must be exactly 3 1/2 in (9 cm) wide, and the centre strip must show exactly 1 in (2.5 cm).
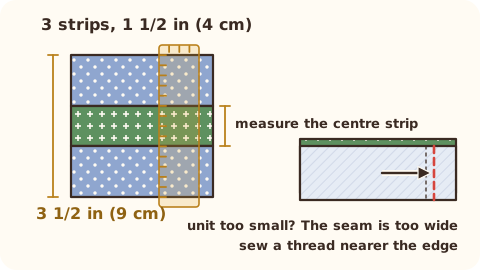
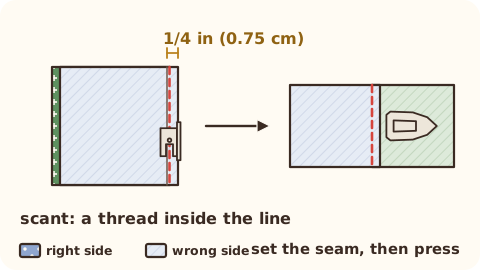
If the unit is narrower, your seam is too wide. Move your guide one or two thread widths toward the needle and sew a scant quarter inch. The scant seam makes up for the thread and the fold that a pressed seam takes up, so the unit finishes at its true size. Mark the perfect line with a stack of masking tape or a magnetic seam guide, and test again.
How much does a tiny seam error cost?
More than you would think, because every seam takes the error twice, once from each piece. Across a row of eight squares there are seven seams, so the row loses 14 times the error.
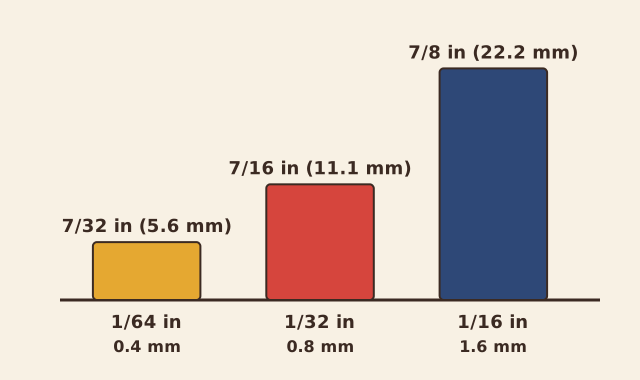
A seam 1/16 in (1.6 mm) too wide, which is hard to see by eye, makes that row 7/8 in (22 mm) short. That is the whole reason the quarter inch test exists.
Seam guides: how to sew a straight, even allowance
Your needle plate is engraved with lines for the common allowances, measured from the needle in its centre position. If the line is hard to follow, stick a strip of masking tape exactly along it, or use a magnetic seam guide. Then watch the fabric edge against the guide, never the needle, and let the feed dogs do the pulling.
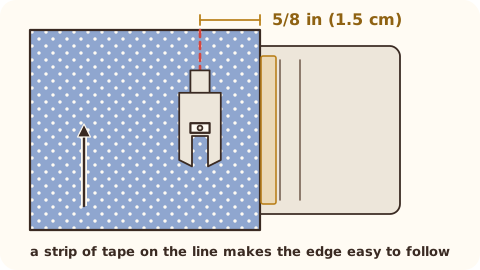
Check yourself with a seam gauge: measure from the edge to the stitches in three places along a test seam. If the three numbers agree, your guide is doing its job.
Seam allowance mistakes and how to fix them
| Mistake | What happens | Fix |
|---|---|---|
| Cutting a Burda magazine, OTTOBRE or Japanese pattern without adding allowance | The garment comes out much too small | Read the pattern's statement first; add 1 to 1.5 cm when tracing |
| Adding allowance to a pattern that already has it | The garment comes out too big and seams sit in the wrong place | Look for "included" on the envelope or a dashed stitching line |
| Sewing to the wrong line on the needle plate | Fit changes on every seam | Mark the right line with tape; check with a seam gauge |
| Sewing quilt pieces with a 5/8 in garment habit | Blocks finish far too small | Fit a 1/4 in foot or set a 0.75 cm guide; do the three strip test |
| Mixing 1/4 in and 0.75 cm in one quilt | Rows and borders refuse to match | Plan each quilt in one system only |
| Reducing the allowance on one side of a seam only | Pieces no longer fit together | Change both edges of every altered seam and move the notches |
| Clipping through the stitches | Holes at curves | Stop a thread or two short of the stitching |
| Snipping notches too deep | Snip shows on the outside | No more than 3 mm (1/8 in) into the allowance |
| Leaving full allowances in enclosed curves | Lumpy collars and necklines | Grade to 1/4 in (6 mm) and 1/8 in (3 mm), clip or notch |
Seam allowance, sorted, in SewNQuilt
SewNQuilt keeps your allowance right from the first cut. Every SewNQuilt project states its seam allowance and whether it is already included in the pattern pieces, so every step afterwards uses that number.
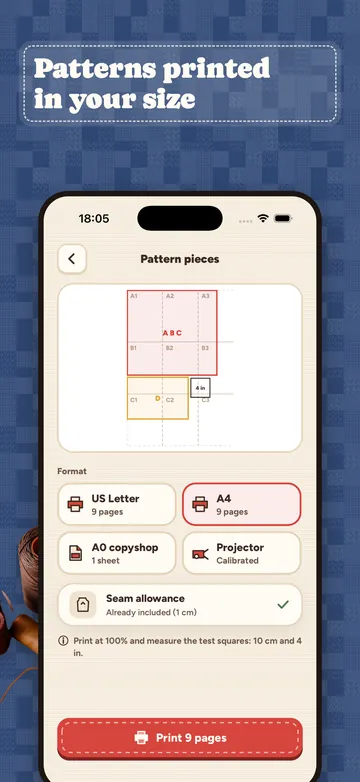
Printing a SewNQuilt pattern in your size? The pattern pieces are printed tiled on US Letter or A4, exported for an A0 copyshop or projected with calibration, and the seam allowance is shown right on the pieces. Inchy's seam allowance converter swaps any value between inch fractions and millimetres in a tap, and every calculator works in imperial or metric, planned natively in each.
Quilters get the quarter inch seam taught properly: the Sew School quilting path opens with Your first quarter inch seam, including the seam accuracy test, with every step drawn. Sewists start with Meet your machine and Straight seams and first makes, where Mabel shows you how to find your line on the needle plate.
SewNQuilt Pro comes in weekly, monthly or yearly plans ($49.99 a year in the US), on iPhone, iPad and Android. Get SewNQuilt and sew every seam on the right line.
FAQ
What is the standard seam allowance?
For garment patterns, 5/8 in (1.5 cm): the US Big 4 and most UK and EU envelope patterns use it. Many indie patterns use 1 cm (3/8 in), and knits drafted for an overlocker use 6 mm to 1 cm. Quilting uses 1/4 in, or 0.75 cm in metric quilt patterns.
Do all patterns include seam allowance?
No. Big 4, most UK and EU envelopes, indie patterns and quilt patterns include it. Burda Style magazine, OTTOBRE and Japanese pattern books print the net pattern, so you add 1 to 1.5 cm (3/8 to 5/8 in) on seams and 2 to 4 cm at hems. Burda envelope patterns vary, so read each one.
Is 5/8 inch the same as 1.5 cm?
Almost. 5/8 in is 15.9 mm and 1.5 cm is 15 mm, a difference of under 1 mm per edge. For garments that difference vanishes into the wearing ease, so the two are used as equivalents. In quilting, where seams repeat many times, the small difference adds up, so each quilt is planned in one system.
What seam allowance do you use for quilting?
1/4 in, or 0.75 cm in metric patterns, often sewn as a scant quarter inch so pressed units finish at size. Special cases use more: 3/8 in (1 cm) for English paper piecing and 1/2 to 5/8 in (1.25 to 1.5 cm) for rag quilts.
Why are quilt squares cut 1/2 inch bigger than the finished size?
Each square loses a 1/4 in seam allowance on both opposite edges, so it is cut finished + 1/4 in + 1/4 in = finished + 1/2 in. A 6 in finished square is cut 6 1/2 in. In metric, with 0.75 cm seams, a 15 cm square is cut 16.5 cm.
How do I add seam allowance to a pattern?
Trace your size, copy every marking, then draw a second line outside the seam line at the allowance you want: 1 to 1.5 cm (3/8 to 5/8 in) on seams and 2 to 4 cm (3/4 to 1 1/2 in) at hems. Add nothing on fold lines. Use a seam gauge or double tracing wheel to keep it even, and label each piece.
Can I use a 3/8 inch seam allowance instead of 5/8?
Yes, as long as you trim 1/4 in (6 mm) from the cutting line of both pieces at that seam, so the seam line stays put. It works beautifully on necklines, collars and facings. Keep 5/8 in on side seams of fitted garments the first time you make a pattern, so you have room to adjust the fit.
Related guides
Sources
- NIST, SI units: length (1 in = 25.4 mm exactly). https://www.nist.gov/pml/owm/si-units-length (checked 31 Oct 2026)
- ISO 4916:1991, Textiles: Seam types, classification and terminology (confirmed 2022). https://www.iso.org/standard/10934.html (checked 31 Oct 2026)
- Sewdirect (Simplicity patterns), Part 5: Understanding seam allowance (Simplicity standard 5/8 in, 1.5 cm; stitching up to 1/4 in closer to the edge). https://www.sewdirect.com/blog/getting-started-with-sewing/part-5-understanding-seam-allowance/ (checked 31 Oct 2026)
- Crafty Mamas, OTTOBRE design magazine class 101 (quoting OTTOBRE's guidance to add about 1 cm seam allowance). https://craftymamas.blogspot.com/2011/11/ottobre-design-magazine-class-101-part.html (checked 31 Oct 2026)
- Coats, seam types. https://www.coats.com/en/info-hub/seam-types/ (checked 31 Oct 2026)
- Quilting Daily, simple block math (finished and cut sizes). https://www.quiltingdaily.com/quilt-blocks-simple-math-part-2 (checked 31 Oct 2026)
- Echidna Sewing, imperial to metric guide for quilters. https://www.echidnasewing.com.au/article/inspiring-and-educating/imperial-to-metric-conversion-guide/ (checked 31 Oct 2026)
Image credits
- Sewing tools on pattern paper: Jacob Moseholt on Pexels, https://www.pexels.com/photo/sewing-tools-and-accessories-on-pattern-paper-31070320/ (ID 31070320).
- Sewing machine needle and presser foot: Andranik Paradyan on Pexels, https://www.pexels.com/photo/close-up-of-a-sewing-machine-needle-in-action-36883230/ (ID 36883230).
- Drawings: SewNQuilt drawing engine. Chart: SewNQuilt. Screenshot: SewNQuilt app.