Most "sewing for beginners" lists give you twenty project ideas and leave out the part that actually decides whether you keep sewing: setting the machine up right. This guide is the opposite. It is one structured week, about an hour a day, with the real numbers a teacher would give you at the machine: which needle, which stitch length, which seam guide, which iron setting. By Friday you will have a finished make.
Your first sewing week at a glance
| Day | Goal | Machine settings | Practice |
|---|---|---|---|
| 1 | Meet the machine | 80/12 universal needle, straight stitch 2.5 mm (about 10 stitches per inch) | Wind a bobbin, thread top and bobbin, sew a few stitches on a scrap |
| 2 | Straight lines | 2.5 mm; an old needle for paper | One sheet of paper lines, then seams on cotton along the 5/8 in (1.5 cm) guide |
| 3 | Seams, pressing, edge finishing | 2.5 mm straight; zigzag 3 to 5 mm wide, 1.5 to 2.5 mm long | Three seams, pressed and zigzag finished |
| 4 | Corners and curves | 2.5 mm; about 2.0 mm on tight curves | Pivot a square, sew a curve, clip and turn |
| 5 | First project | 2.5 mm; zigzag for joining elastic | A scrunchie (or a simple tote) |
Each day builds on the one before, so resist skipping ahead. Twenty calm minutes of straight lines on Day 2 will do more for your sewing than any project video.
What do you need to start sewing?
| Tool | What to choose | Why |
|---|---|---|
| Sewing machine | Any machine with a good straight stitch and a zigzag | That is all the first year needs |
| Machine manual | Paper or PDF for your exact model | Threading paths differ between machines |
| Needles | Universal 80/12, a pack of five | The right size for woven cotton |
| Thread | All purpose polyester, Tex 27 to 30 (ticket 100 to 120) | Strong and smooth for everyday seams |
| Fabric scissors | 8 to 10 in (20 to 25 cm) shears used only on fabric | Paper dulls them fast |
| Thread snips | Small spring snips | Trim threads at the machine |
| Pins and pincushion | Glass head pins | They survive the iron |
| Seam gauge | 6 in (15 cm) metal gauge with a slider | Checks your allowance and hems |
| Tape measure | 60 in (150 cm) | Measures everything else |
| Seam ripper | Any | Every sewist's best friend |
| Iron and board | Steam iron with a cotton setting | Pressing is half of sewing |
| Marking tool | Chalk or a washable fabric marker | Marks lines and dots |
| Masking tape | Any | Makes a bold seam guide on the needle plate |
Buy a few more 80/12 universal needles than you think you need. A fresh needle solves more beginner problems than anything else on this page.
Which fabric is best for beginners?
Choose a firm, plain woven cotton: quilting cotton, cotton calico (called muslin in the US) or a mid weight linen and cotton blend. Quilting cotton weighs about 130 to 160 g/m² (3.8 to 4.7 oz/yd²), which is the sweet spot for learning. Here is why it is the right teacher:
- It does not stretch. Knits curl and grow as you sew; a woven stays put.
- It does not slip. Satin and chiffon slide; cotton grips the feed dogs.
- It presses crisply. You can see your seam line and your mistakes, and press them out.
- It takes a standard needle. An 80/12 universal and a 2.5 mm stitch are exactly right for it.
- It is cheap and cheerful. You will not mind practising on it.
Wash and dry your fabric the way you will wash the finished item before you cut it, because cotton can shrink a few percent in its first wash. Save stretch fabrics, silks and velvets for after your first month.
Day 1: meet your machine
Sit down with your machine and its manual. Today is about knowing what every part does, not about sewing a project.
Find these parts: the spool pin, thread guides, tension dial, take up lever, needle and needle clamp, presser foot and its lever, feed dogs (the little teeth under the foot), needle plate with its seam guide lines, bobbin and bobbin area, handwheel, stitch selector, stitch length and width controls, reverse lever, and the foot control.
How to change the needle
Even a new machine deserves a fresh needle for its first sewing session.
- Turn the machine off.
- Raise the needle to its highest point with the handwheel (always turn it toward you).
- Loosen the needle clamp screw and pull the old needle down.
- Hold the new needle with the flat side of the shank to the back (on most home machines that load from the front), push it fully up and tighten the screw.
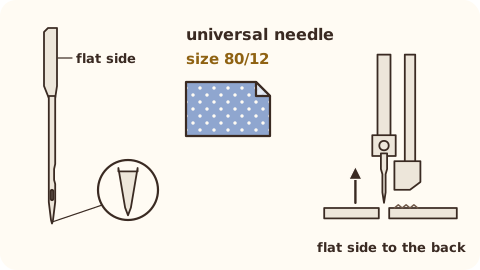
Home machines take needles in the 130/705 H system (also called HAx1 or 15x1). The size reads as two numbers: in 80/12, 80 means the blade is 0.80 mm across and 12 is the US size. Fit a fresh needle for each new project, and change it at once when you notice skipped stitches, shredded thread, puckering or a popping sound as the needle goes in.
How to wind a bobbin and thread the bobbin
Use the bobbins made for your machine; similar looking bobbins from other brands can cause tension trouble. Follow the winding path in your manual (from the spool, round the bobbin winding tension guide, to the bobbin), wind an even, firm bobbin and cut the thread. Drop it into the bobbin area the way the manual shows. Check the direction in the manual: on many drop in machines the bobbin turns anticlockwise as you pull the thread. On front loading machines it sits in a removable bobbin case.
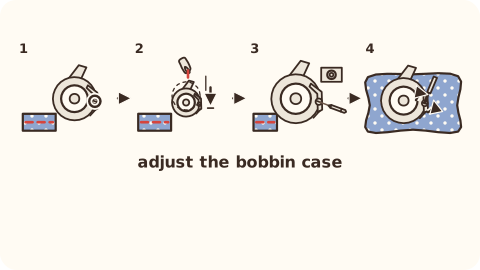
That tiny screw on the bobbin case sets the bobbin tension. Leave it exactly as the factory set it while you learn; almost every tension problem a beginner meets is fixed by rethreading the top thread instead.
How to thread a sewing machine
The single most important habit in sewing: raise the presser foot before you thread the top. With the foot up, the tension discs open and the thread drops between them. With the foot down, the thread rides over the closed discs and you get a tangle of loops under the fabric.
- Put the spool on the spool pin with its cap.
- Take the thread through the top thread guide.
- Bring it down the channel and around the tension discs.
- Up through the eye of the take up lever (turn the handwheel toward you until the lever is at its highest point so you can see it).
- Down through the lower thread guides near the needle.
- Through the eye of the needle, usually from front to back.
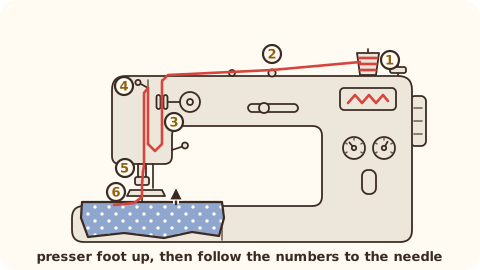
To bring up the bobbin thread, hold the top thread lightly, turn the handwheel toward you one full turn, and a loop of bobbin thread comes up through the needle plate. Pull both threads under the foot and toward the back, about 4 in (10 cm) long.
Stitch length: what the numbers mean
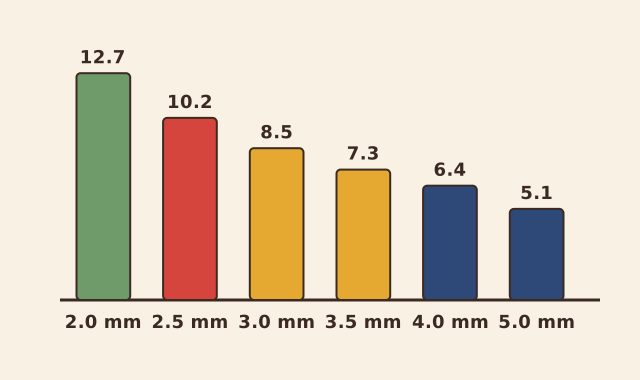
Set a straight stitch at 2.5 mm. Your machine measures stitch length in millimetres; many patterns and older books count stitches per inch (SPI). The conversion is simple: SPI = 25.4 divided by the stitch length in mm. So 2.5 mm is about 10 stitches per inch.
| Stitch length | Stitches per inch | Stitches per cm | Use it for |
|---|---|---|---|
| 1.5 to 2.0 mm | 12.7 to 16.9 | 5 to 6.7 | Staystitching curves |
| 2.0 to 2.2 mm | 11.5 to 12.7 | 4.5 to 5 | Quilt piecing, tight curves |
| 2.5 mm | 10.2 | 4 | Everyday seams on woven fabric |
| 3.0 to 3.5 mm | 7.3 to 8.5 | 2.9 to 3.3 | Heavier fabric; walking foot quilting |
| 3.0 to 4.0 mm | 6.4 to 8.5 | 2.5 to 3.3 | Topstitching |
| 4.0 to 5.0 mm | 5.1 to 6.4 | 2 to 2.5 | Gathering stitches |
| 4.0 to 6.0 mm | 4.2 to 6.4 | 1.7 to 2.5 | Machine basting |
Needle basics in one minute
- Universal 80/12: woven cotton, calico, poplin and most beginner fabric.
- Universal 70/10 to 90/14: the range for most woven fabrics; smaller numbers for lighter cloth.
- Jersey (ballpoint) or stretch: knits, later.
- Jeans 90/14 or 100/16: denim.
- Microtex 60/8 or 70/10: fine lawn, voile and silk.
Our full sewing machine needle size chart pairs every fabric with its needle and thread.
End Day 1 by sewing a few stitches on a folded scrap. If the stitches look the same on both sides, your machine is threaded beautifully.
Day 2: straight lines on paper, then on fabric
Paper first
Fit an old needle (paper dulls the point, so this one retires afterwards) and leave the machine unthreaded. Draw straight lines, gentle curves and a square on printer paper with a ruler. Then:
- Place the paper under the foot, lower the needle into the start of a line with the handwheel, then lower the foot.
- Press the foot control gently. Keep both hands flat on the paper and let the feed dogs pull it; your hands only steer.
- Watch the line just ahead of the needle, not the needle itself.
- At each corner, stop with the needle down, raise the foot, turn the paper, lower the foot and carry on.
Sew a whole sheet. Count how many holes land right on the line. Then sew another sheet and beat your score.
Now fabric, on the 5/8 in (1.5 cm) guide
Fit your fresh 80/12 needle and thread the machine. Find the 5/8 in (1.5 cm) line engraved on the needle plate, measured from the needle in its centre position. If it is hard to see, stick a strip of masking tape along it.
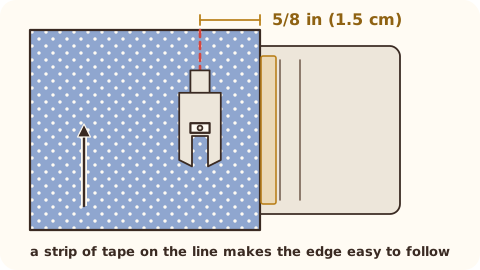
5/8 in (1.5 cm) is the standard seam allowance for garment patterns from the US Big 4 and most UK and EU envelopes, so it is the line you will follow most. Our seam allowance guide covers the others, including the quilter's 1/4 in.
How to sew your first seam
- Cut two strips of cotton 4 x 10 in (10 x 25 cm).
- Place them right sides together (the printed sides facing each other) and pin every 4 in (10 cm), pins at right angles to the edge.
- Line the raw edges up with the 5/8 in (1.5 cm) guide.
- Lower the foot. Sew 3 stitches forward, 3 back, then forward to the end, and backstitch 3 stitches again. Those backstitches lock the seam.
- Take each pin out just before it reaches the foot. Sewing over pins breaks needles.
- Raise the needle to its highest point, lift the foot, slide the fabric away and cut the threads, leaving tails of about 4 in (10 cm).
- Press the seam flat to set the stitches.
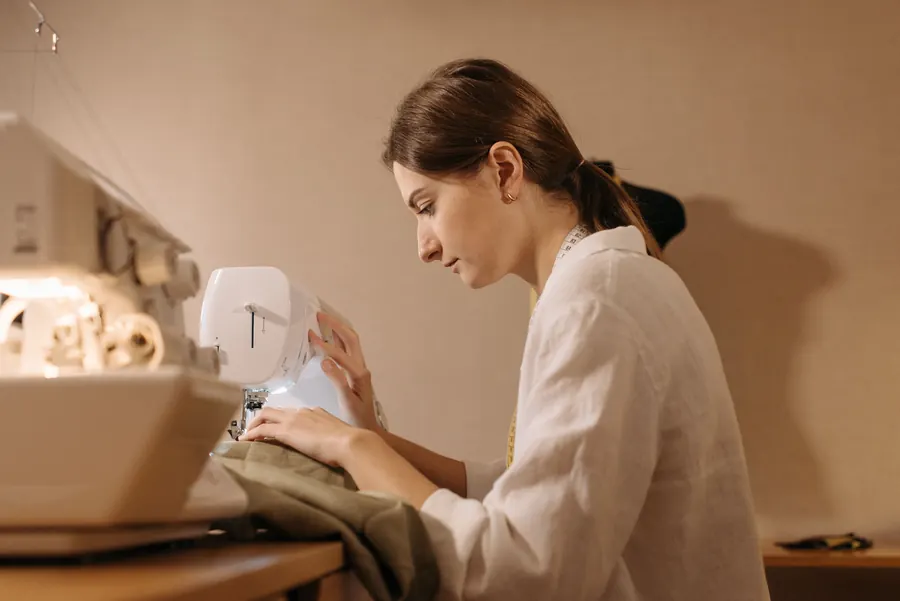
Sew three seams this way and check each with your seam gauge in three places. When the three numbers agree, you have a straight seam. That is the whole of sewing in miniature.
Day 3: seams, pressing and finishing edges
Press, do not iron
Set the iron to cotton: three dots, up to 210 °C (410 °F) under the ISO 3758:2023 care symbols. Pressing is not ironing. You lift the iron and set it down, so the fabric is never pushed out of shape.
- Set the seam: press it flat exactly as you sewed it.
- Press it open: open the two pieces, run your fingertip along the seam to part the allowances, then press them open from the wrong side.
- Or press to one side when the pattern asks.
A seam pressed as you go looks like a professional seam. A seam left unpressed until the end looks homemade, in the wrong way.
Finish the raw edges with a zigzag
Woven cotton frays. A zigzag stitched along each raw edge stops it.
- Sew and press the seam first.
- Set a zigzag 3 to 5 mm wide and 1.5 to 2.5 mm long.
- Stitch along each raw edge so the right swing of the zigzag just clears the edge, or stitch close to the edge and trim afterwards.
- Press the allowances open or to one side, as the pattern says.
If your machine has an overcast foot and stitch, use it: about 5 mm wide and 2.5 mm long, and let the foot guide the edge.
Check your tension
Today is a good day to learn what balanced tension looks like. Sew a test on a double layer of fabric with one thread colour on top and another in the bobbin.
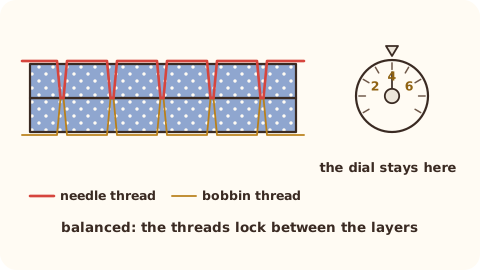
Balanced stitches lock in the middle of the layers: no bobbin colour on top and no top colour underneath. If yours look like that, leave the dial alone. If they do not, see the five fixes below.
Day 4: corners and curves
Corners: pivot and trim
- Sew toward the corner and stop exactly 5/8 in (1.5 cm) from the next edge, with the needle down in the fabric.
- Lift the foot, turn the fabric 90 degrees around the needle, lower the foot and sew on.
- Trim the allowance diagonally across the point, about 1/8 in (3 mm) from the stitches.
- Turn it right side out and ease the point out with a point turner, never with scissors.
Practise on two 6 in (15 cm) squares sewn right sides together on three sides. Turn it out, press it, and you have a tiny cushion cover with four sharp corners.
Curves: slow down and steer
- Shorten the stitch to about 2.0 mm on tight curves so the line bends smoothly.
- Sew slowly, keeping the fabric edge on the 5/8 in (1.5 cm) guide at the point just in front of the needle.
- Every few stitches, stop with the needle down, lift the foot and turn the fabric a little.
- On an inward curve, clip straight into the allowance every 3/8 to 1/2 in (1 to 1.3 cm). On an outward curve, cut small V notches. Never cut through the stitches; leave a thread or two.
Draw a wavy line on a scrap with chalk and follow it. Then draw a circle. Curves are where you will feel your control growing.
Day 5: your first sewing project
Today you make something. Our pick for the first project is a scrunchie, and for good reasons: it takes about half an hour, uses a scrap of fabric, practises a straight seam, turning, threading elastic and a neat join, and you can wear it tomorrow.
A scrunchie, in short:
- Cut one strip of cotton 20 x 4 in (50 x 10 cm), with the long side across the grain.
- Fold it in half lengthwise, right sides together, and sew the long edge with a 3/8 in (1 cm) seam, leaving the ends open.
- Turn the tube right side out with a safety pin.
- Thread 8 in (20 cm) of 1/4 in (6 mm) elastic through the tube with the safety pin, pinning the other end so it cannot escape.
- Overlap the elastic ends by 1 in (2.5 cm) and zigzag across them three times.
- Fold 3/8 in (1 cm) to the inside on one end of the tube, tuck the other end inside it and edgestitch the join.
Or a simple tote. If you would rather make something bigger, a lined or unlined tote practises long straight seams, boxed corners and topstitched straps. Choose a pattern marked beginner, in a sturdy woven cotton, and follow its seam allowance exactly.
Love the idea of quilting? Quilting is a wonderful first craft too, and it uses the same machine. Your first quilting make can be a mug rug: a small quilted mat that teaches the quarter inch seam, layering, quilting and binding in an evening. When you are ready for a full size quilt, our guide to making your first quilt walks through one complete throw.
Days 6 and 7: repeat and choose
Make a second scrunchie in a different fabric, or sew the tiny cushion cover from Day 4 into a real one. Repetition is how the steps become automatic. Then pick the next make: an envelope cushion cover, a pouch or a simple elastic waist skirt are all lovely second projects. For the fabric amounts, our guide to how much fabric you need has the numbers, and when you are ready for clothes, start with body measurements.
The five fixes every beginner needs
Every sewist meets these in the first week. None of them mean you are doing it wrong; they mean your machine is talking to you.
| What you see | Most likely cause | Fix |
|---|---|---|
| A nest of loops under the fabric | The top thread missed the tension discs | Raise the presser foot and rethread the top thread from the start |
| Bobbin thread showing on top | Needle thread too tight | Rethread first; if it persists, lower the top tension one number at a time |
| Top thread lying flat on the underside | Needle thread too loose | Rethread first; if it persists, raise the top tension one number at a time |
| Skipped stitches or shredded thread | Worn, bent or wrong needle | Fit a new 80/12 universal, flat side to the back, pushed fully up |
| Fabric will not move, or the machine jams at the start | Feed dogs lowered, foot not down, or thread tails too short | Raise the feed dogs, lower the foot, hold both thread tails for the first stitches |
Two more habits prevent most of these: change one thing at a time and test after each change, and clean the lint from the bobbin area after every project. Our sewing machine troubleshooting guide covers every symptom in depth, with drawings of each tension problem.
Learn to sew with SewNQuilt
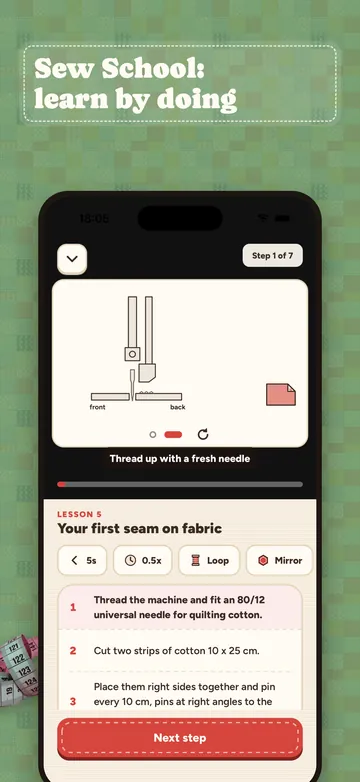
This week is exactly how SewNQuilt teaches. The Sew School sewing path, with Mabel as your teacher, starts with Meet your machine: the parts of your machine, winding a bobbin, threading top and bobbin, first stitches on paper and your first seam on fabric. Its practice project is a scrunchie. Then come Straight seams and first makes and Curves, corners and hems, level by level. Every lesson has a 5 second replay, slows to 0.5x, loops and mirrors for left handed makers.
Machine School sits right beside it, with lessons like Tension made simple, Which needle for which fabric and Cleaning the bobbin area.
When you sew a project, Sew Mode shows one calm step per screen, drawn by SewNQuilt's own drawing engine in your own fabrics, with a step timer, read aloud on request and hands free voice commands. Tap "I need help" on any step and Ask Pip answers about that exact step. And when a seam looks odd, take a photo: Pip's Stitch Check reads the tension, stitch line and skipped stitches and gives you a fix checklist.
SewNQuilt Pro comes in weekly, monthly or yearly plans ($49.99 a year in the US), on iPhone, iPad and Android. Get SewNQuilt and sew your first seam today.
FAQ
Can I teach myself to sew?
Yes. Thousands of makers learn at home with a machine, a manual and a structured plan like the week on this page. Start with straight lines on paper, then seams on cotton, and finish a small project in your first week so you feel the progress.
What should I sew first as a beginner?
A scrunchie, a pillowcase, an envelope cushion cover or a simple tote. Each one uses straight seams on woven cotton and finishes in an hour or two. A scrunchie is our favourite: it takes about half an hour and a single 20 x 4 in (50 x 10 cm) strip.
What stitch length should a beginner use?
2.5 mm for everyday seams on woven fabric, which is about 10 stitches per inch. Shorten to about 2.0 mm for tight curves and lengthen to 3.0 to 4.0 mm for topstitching. The conversion is stitches per inch = 25.4 divided by the length in mm.
What needle should I use for cotton?
A universal 80/12. It suits quilting cotton, calico and most beginner fabrics. Fit a new one for each project, and change it straight away if stitches skip or the thread shreds.
Why does my thread bunch up under the fabric?
Almost always because the top thread was threaded with the presser foot down, so it missed the tension discs. Raise the foot, rethread the top thread from the spool and test again. Holding both thread tails for the first few stitches helps too.
What seam allowance do beginners use?
5/8 in (1.5 cm) for most garment patterns, the standard of the US Big 4 and most UK and EU envelopes. Many indie patterns use 1 cm (3/8 in), and quilting uses 1/4 in (0.75 cm). Always follow the allowance printed on your pattern.
How long does it take to learn to sew?
You can sew a straight seam on day one and a finished project within a week. Confident garment sewing, with zippers, buttonholes and set in sleeves, usually comes over a few months of regular making.
Related guides
Sources
- NIST, SI units: length (1 in = 25.4 mm). https://www.nist.gov/pml/owm/si-units-length (checked 31 Oct 2026)
- ISO 4915:1991, Textiles: Stitch types, classification and terminology. https://www.iso.org/standard/10932.html (checked 31 Oct 2026)
- ISO 3758:2023, Textiles: Care labelling code using symbols (ironing temperatures). https://www.iso.org/standard/74401.html (checked 31 Oct 2026)
- SCHMETZ, FAQs (needle change signs). https://www.schmetzneedles.com/pages/faqs (checked 31 Oct 2026)
- SCHMETZ, ABC pocket guide to needles and fabrics. https://www.allbrands.com/images/Barbara/ABC-brochure.pdf (checked 31 Oct 2026)
- SCHMETZ, colour code chart (revised 2025). https://cdn.shopify.com/s/files/1/0579/8857/9507/files/SCHMETZ-Color-Code-Chart-Base-Revised-2025-012125.pdf (checked 31 Oct 2026)
- Coats, thread numbering (Tex and ticket). https://www.coats.com/en/info-hub/thread-numbering/ (checked 31 Oct 2026)
- Coats, basic stitch types. https://www.coats.com/en/info-hub/basic-stitch-types/ (checked 31 Oct 2026)
- Sewdirect (Simplicity patterns), Understanding seam allowance (Simplicity standard 5/8 in, 1.5 cm). https://www.sewdirect.com/blog/getting-started-with-sewing/part-5-understanding-seam-allowance/ (checked 31 Oct 2026)
Image credits
- Home sewing machine on a table: Letícia Alvares on Pexels, https://www.pexels.com/photo/close-up-of-sewing-machine-on-table-34908665/ (ID 34908665).
- Woman sewing at a machine: Pavel Danilyuk on Pexels, https://www.pexels.com/photo/woman-sewing-textile-on-sewing-machine-6461145/ (ID 6461145).
- Drawings: SewNQuilt drawing engine. Chart: SewNQuilt. Screenshot: SewNQuilt app.