

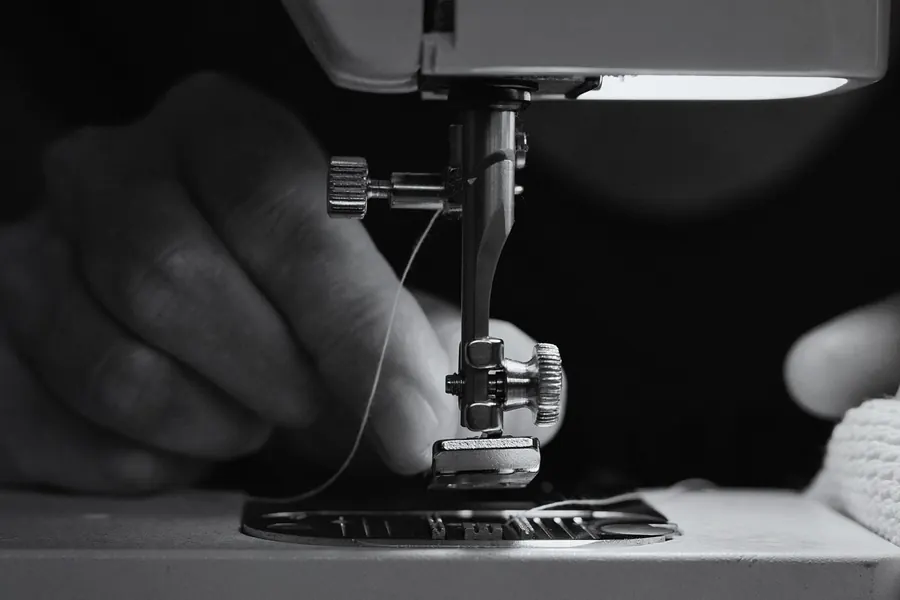
Quick diagnosis: what do your stitches look like?
Find the symptom, start with the first cause, and test after each fix. Most problems end at the first or second cause.
| What you see | Most likely cause, first | Fix |
|---|---|---|
| Loops or a nest of thread underneath | Top thread missed the tension discs (threaded with the foot down) | Raise the foot, rethread the top completely. Then check the bobbin |
| Nest only at the start of a seam | Thread tails not held, or needle not at its highest point when you started | Hold both tails toward the back for 2 or 3 stitches; start with the needle up |
| Bobbin thread shows as dots on top | Needle thread too tight, or bobbin not clicked into its tension spring | Reseat the bobbin, then lower the needle tension one step |
| Needle thread lies flat on the underside | Needle thread too loose | Rethread, then raise the needle tension one step |
| Skipped stitches | Worn needle, or the wrong type (Universal on stretch knits) | Fresh needle of the right type, pushed fully up, flat side to the back |
| Top thread breaks or shreds | Needle eye too small for the thread, or a damaged needle | Larger needle or a Topstitch needle; rethread; check the spool cap |
| Needle breaks | Pulling the fabric, hitting a pin, needle too fine for the layers | Let the feed dogs do the work, remove pins before the foot, size up |
| Puckering | Tension too tight, needle too large or blunt, stitch length wrong for the fabric | Finer sharp needle, stitch length to suit the fabric, tension down a step |
| Fabric does not move | Feed dogs lowered, stitch length at 0, or foot not down | Raise the feed dogs, set a stitch length, lower the foot |
| Uneven stitch length | Pushing or pulling the fabric, lint under the feed dogs | Guide, do not steer; clean the feed dogs |
| Machine jams or locks | Thread caught in the hook area | Stop, cut the threads free, remove the bobbin case, clean, rethread |
Why is my thread bunching underneath the fabric?
The nest is on the bottom, but the problem is almost always on top. This surprises nearly everyone the first time.
Here is the mechanism. When the presser foot is up, the tension discs open. When the foot is down, they squeeze shut. Thread the machine with the foot down and the thread rides on top of the closed discs instead of sliding between them. The needle thread then has no tension at all. The hook pulls out a big loop on every stitch, nothing pulls it back up, and the loops pile into a nest under the fabric.
That is why turning the tension dial higher rarely cures a bird nest. The thread isn't in the discs, so the dial has nothing to squeeze. Rethread first.
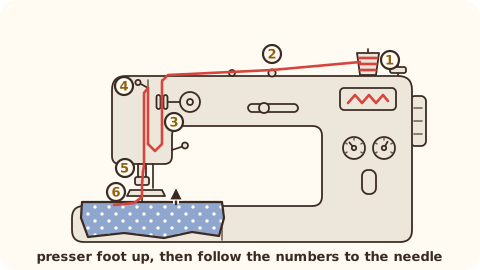
How to rethread a sewing machine with the presser foot up
- Raise the presser foot. This opens the tension discs.
- Raise the needle. Turn the handwheel toward you until the needle and the take up lever are at their highest point.
- Take the old thread out. Snip it near the spool and pull the tail out through the needle, in the direction it travels, so lint is not dragged back into the discs.
- Seat the spool. Use a spool cap a little larger than the spool end, so the thread cannot catch on it.
- Follow the numbered path on your machine: through the first guide, down the channel, around the U turn and back up.
- Thread the take up lever. It is the part that bobs up and down. Missing it causes instant nests. Make sure the thread clicks into its eye.
- Thread the needle, front to back on most domestic machines (check your manual), and pull about 4 to 6 in (10 to 15 cm) of tail under the foot toward the back.
- Test the discs. Lower the foot and pull the thread just above the needle: you should feel a firm, even drag. Raise the foot and pull again: it should slide freely. If it feels the same both ways, the thread is not in the discs. Rethread.
That last test takes five seconds and tells you more than any dial setting.
Why does it nest only at the start of a seam?
Three usual causes. You started with the needle partly down, so the take up lever was not at the top. You didn't hold the tails. Or you started right at the edge of a thin fabric, and the needle pushed the corner into the needle plate hole.
Fixes: start with the needle at its highest point, hold both tails toward the back for the first 2 or 3 stitches, and begin about 1/4 in (6 mm) in from the edge. For fine fabrics, piece on a small "leader" scrap and sew straight off it onto your fabric. Quilters chain pieces the same way, which saves thread too.
How to read thread tension from your stitches
On a lockstitch machine (ISO 4915 stitch type 301), the needle thread and the bobbin thread interlock between the layers of fabric. Tension is the tug of war between them. To see it clearly, use one colour on top and a different colour in the bobbin, and sew on a double layer of the fabric you are actually using.
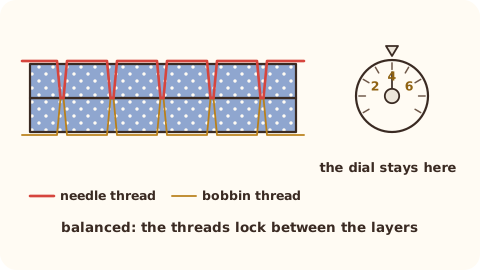
Balanced. The top looks like a neat row of top thread only. The bottom looks like a neat row of bobbin thread only. Neither colour peeks through to the other side.
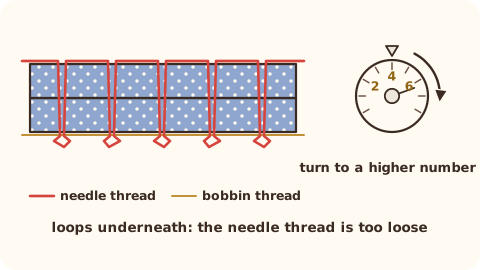
Loops underneath. The needle thread has too little tension. Most often the thread has slipped out of the discs, so rethread with the foot up first. If loops remain after a careful rethread, turn the needle tension to a higher number, one step.
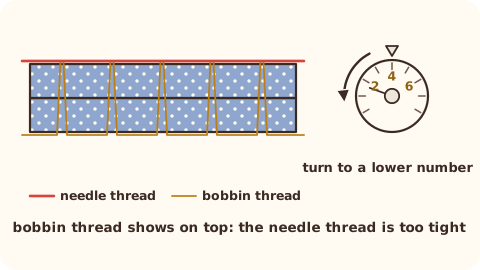
Bobbin thread on top. Little dots of bobbin colour show on the top side because the needle thread pulls too hard. Check the bobbin is clicked into its tension spring, then turn the needle tension to a lower number, one step.
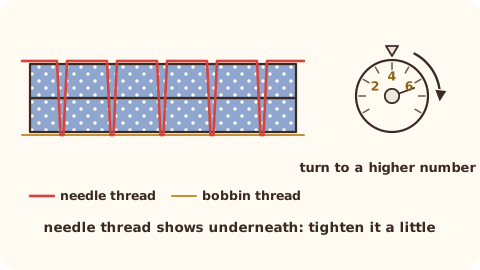
Needle thread underneath. The top thread lies along the underside in a straight line or small loops. It is the gentle version of a bird nest: rethread, then raise the needle tension a little.
A teacher's note: on many machines the needle tension is the only dial you should touch. Many machines mark a default setting on the dial or in the manual, and most sewing happens at or near it. If you find yourself at the very top or bottom of the dial, something else is wrong.
Fix it in this order
Experienced sewists troubleshoot in the same order every time, from the quickest and most likely fix to the least. Change one thing, sew a test, then move on.
- Rethread the top with the presser foot up, as above. Do the disc test.
- Check the bobbin. Take it out. Is it wound evenly and not overfilled? Is it the bobbin class your manual specifies? Drop it back in so the thread unwinds in the direction your manual shows, then pull the thread through the slot until it slides under the tension spring. You will feel it catch.
- Fit a fresh needle of the right type and size. Push it fully up with the flat side to the back on most front loading machines, and tighten. See our needle size chart for every fabric.
- Clean out the lint. Remove the needle plate and bobbin case as your manual describes and brush out the fluff around the feed dogs and the hook. Many manuals advise against canned air, which blows lint deeper. Oil only if and where your manual says.
- Hold the thread tails for the first 2 or 3 stitches and start with the needle at its highest point.
- Then, and only then, adjust tension. Sew on a scrap of your project fabric folded double. Turn the needle tension dial one number at a time, sew 4 in (10 cm) after each change, and look at both sides.
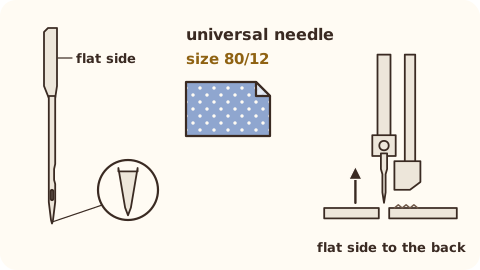
Worked example, tension test. Imperial: cut two strips of your fabric about 4 x 10 in, place them together and sew down the middle with blue thread on top and red in the bobbin. Metric: two strips of 10 x 25 cm, the same test. Bobbin red shows on top? Lower the needle tension one number and sew another 4 in (10 cm). Balanced? Note the number in your project notes so the next session starts right.
Should I adjust the bobbin tension?
Rarely. The bobbin case is set at the factory and most problems are on top. Adjust it only when the top is threaded perfectly, the needle is new, the machine is clean, and the needle tension still cannot balance at a sensible setting. Many drop in bobbin manuals say to leave it alone entirely.
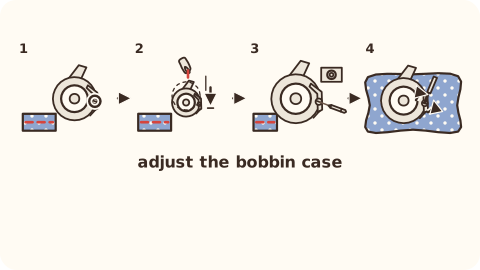
If you do: photograph or mark the screw's starting position first. Turn it a tiny amount (think of moving from one minute to the next on a clock face), clockwise to tighten and anticlockwise to loosen, then test. A common check is to hold the thread and let a loaded removable case hang: it should stay put, then slide a little when you give the thread a gentle jerk. Better still, keep a second bobbin case just for specialty threads so your everyday one stays at its factory setting.
Why does my sewing machine skip stitches?
A skipped stitch happens when the hook misses the loop of needle thread. The loop forms behind the needle, in the scarf. Anything that changes that loop or the needle's position makes the hook miss.
- Worn or bent needle. The first and cheapest fix. SCHMETZ lists skipped and uneven stitches as a sign to change the needle at once.
- Wrong needle type. Elastic knits need a Stretch needle (75/11 or 90/14). A Universal on swimwear or activewear skips again and again.
- Needle not fully up or in backwards. The hook times its pass to the scarf. A needle set low or turned round shifts the scarf away from the hook.
- Needle too fine for the job. Heavy layers flex a thin needle away from the hook. Size up, or use a Jeans needle on denim.
- Thread too heavy for the eye. Topstitch thread needs a Topstitch needle.
- Flagging fabric. Fine or stretchy fabric that lifts with the needle opens the loop late. Use a straight stitch plate or a stabilizer, and keep the presser foot pressure on its default.
If skipping continues with a new, correctly fitted needle of the right type on several fabrics, the machine's timing may be off. That is a technician job.
Why does my thread keep breaking?
Check these in order:
- Threading. A missed guide or a thread wrapped round the spool pin saws through thread in seconds. Rethread with the foot up.
- Needle. A burr on the eye or a needle too small for the thread will fray it. Fit a fresh needle; for heavy or specialty thread, a Topstitch or Metallic needle with its long eye.
- Spool. A notch in the spool rim can catch the thread. Turn the spool so the notch faces away from the thread path, or use a spool cap. Cross wound spools often prefer a horizontal pin, and stacked spools a vertical pin.
- Tension. Very tight needle tension snaps fine thread. Lower it a step after the steps above.
- Thread quality. Old thread dries out and becomes brittle. If it snaps easily between your hands, retire it to hand basting.
Thread still shredding after all of this? In a SCHMETZ answer about shredding while quilting, the fix is a larger needle or a timing check by a technician.
Why does my needle keep breaking?
SCHMETZ lists the usual causes: the wrong needle type or size for the fabric, pushing or pulling the fabric under the foot, too much thread tension, and machine timing. Add two more you will meet in real life:
- Pins. Sewing over pins is a gamble. If you hit one, change the needle even if it survived, because the point is damaged.
- Twin needle on the wrong plate or stitch. Use the zigzag plate and keep the stitch width inside the opening. Turn the handwheel by hand for the first stitch to check.
Use a Jeans needle sized 100/16 or 110/18 over thick seam humps, walk the handwheel by hand over the bulkiest crossing, and let the feed dogs pull the fabric. If needles still break with the right needle and no pulling, the timing needs a technician.
Why is my fabric not feeding?
- Feed dogs are down. Many machines lower them for darning and free motion quilting. Raise them again (some machines need a few stitches before they pop up).
- Stitch length is 0. Set it to 2.5 mm, about 10 stitches per inch.
- Presser foot not lowered. It happens to everyone.
- Lint packed between the feed dog teeth. Brush it out.
- Thick or slippery layers. Use a walking foot for quilts, minky and vinyl, and a Teflon or roller foot for vinyl and faux leather.
- Thin fabric pulled into the hole. Start 1/4 in (6 mm) in from the edge, or use a leader scrap.
Puckering and uneven stitches
Seam puckering on lightweight fabric usually comes from a needle that is too large or blunt, tension that is too tight, or a stitch length that does not suit the fabric. Switch to a Microtex 60/8 or 70/10 on voile and lawn, set the stitch to about 2.0 mm on those sheers and 2.5 mm on quilting cotton, and lower the needle tension one step. Hold the fabric gently taut in front of and behind the foot, without pulling. Tissue paper underneath helps on sheers.
Uneven stitch length is nearly always hands. The feed dogs set the stitch length. Your hands only guide. Push or pull, and the stitches stretch or bunch. A clean feed dog area and a fresh needle help too.
Machine jams and the handwheel will not turn
Stop at once. Sewing on through a jam can damage the hook. Raise the foot, cut the top and bobbin threads, and lift the fabric away gently. Remove the needle plate and bobbin case, pick out every thread end with tweezers, brush away lint, and reassemble exactly as it was. Turn the handwheel toward you by hand: it should move freely through a full turn. Then rethread both threads from scratch.
Stitch length: millimetres and stitches per inch
Machines from Europe and Asia set stitch length in millimetres. Many US patterns and older machines speak in stitches per inch (SPI). The conversion is simple: SPI = 25.4 ÷ stitch length in mm, and mm = 25.4 ÷ SPI.
| Job | Stitch length | Stitches per inch |
|---|---|---|
| Foundation paper piecing | 1.5 mm | about 17 |
| Quilt piecing | 2.0 to 2.2 mm | about 12 1/2 to 11 1/2 |
| Everyday garment seams | 2.5 mm | about 10 |
| Denim, canvas, bags | 3.0 mm | about 8 1/2 |
| Topstitching | 3.0 to 4.0 mm | about 8 1/2 to 6 1/4 |
| Walking foot quilting | 2.5 to 3.5 mm | about 10 to 7 |
| Machine basting | 4 to 6 mm | about 6 1/4 to 4 1/4 |
| Free motion quilting | set by your hand speed | 8 to 12 (3 to 5 per cm) |
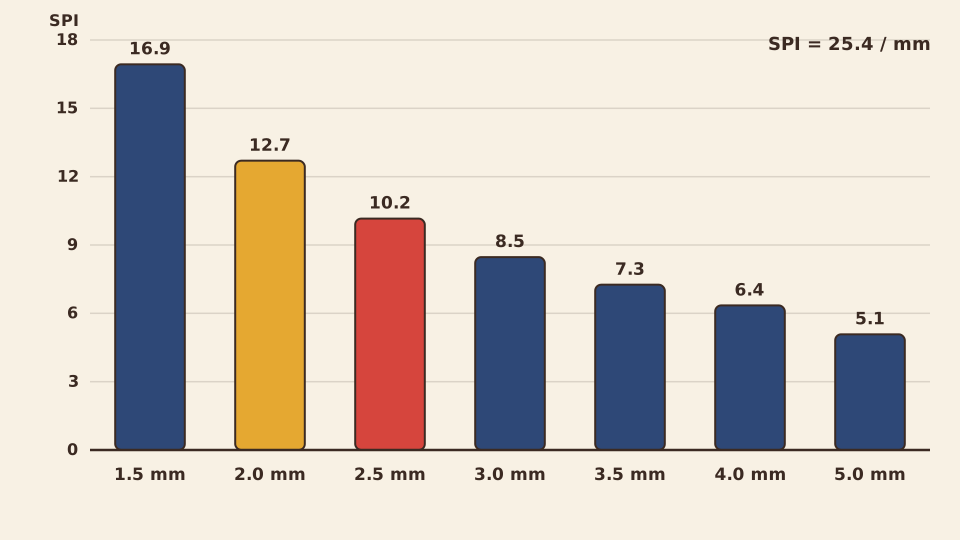
Worked example, US pattern. The pattern says 12 stitches per inch. 25.4 ÷ 12 = 2.1 mm. Set 2.1 mm, or 2.0 mm if your machine moves in larger steps.
Worked example, metric pattern. The pattern says 2.5 mm. 25.4 ÷ 2.5 = 10.2, so about 10 stitches per inch on a machine marked in SPI.
Stitch length also affects the problems above. Stitches on vinyl and leather should be long (3.0 to 3.5 mm or more), because every hole is permanent and close holes tear like a perforation.
When should I take my machine to a technician?
You have rethreaded with the foot up, changed the bobbin, fitted a fresh needle of the right type, cleaned the lint and tested on a folded scrap. Book a service if any of these remain:
- the needle hits the needle plate, the foot or the hook,
- needles keep breaking with the right needle and no pulling,
- stitches skip on every fabric with a new, correctly fitted needle,
- thread shreds at the hook with a correctly sized needle,
- grinding, clunking or knocking that cleaning does not cure,
- the handwheel is stiff or will not turn after a jam is cleared,
- a hot or burning smell from the motor,
- after the machine has been dropped or knocked hard.
SCHMETZ says it plainly: poor timing breaks needles and can damage the needle plate and bobbin hook, and a technician can reset it. Many manuals also recommend a regular service at set intervals; follow yours.
Mistakes that make it worse
Cranking the tension dial to fix a bird nest. The thread is not in the discs, so the dial does nothing. Rethread with the foot up.
Changing three things at once. You fix it and never learn why. One change, one test.
Testing on a single layer of a different fabric. Tension changes with thickness and fibre. Test on a folded scrap of your project fabric.
Pulling the fabric to "help" over thick seams. The needle deflects, hits the plate and breaks. Walk the handwheel instead.
Tugging a jammed seam free. You can bend the needle or knock the hook. Cut the threads and open the bobbin area.
Keeping the needle "because it still works". A dull needle causes skipped stitches, puckers and shredding long before it looks worn.
Blowing lint into the machine. Brush it out instead.
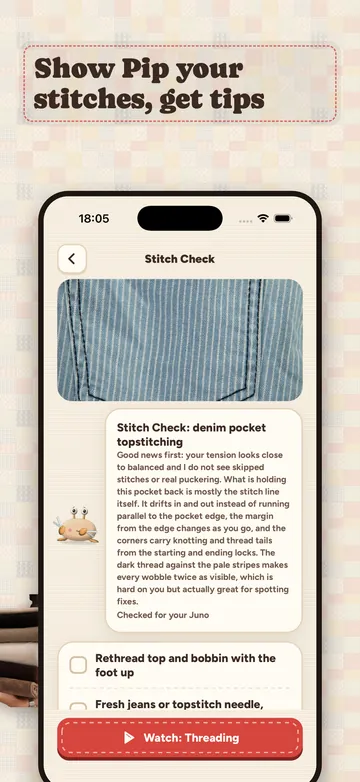
Show Snip your stitches: Stitch Check in SewNQuilt
Stuck at the machine with a nest you cannot read? Snip the crab is SewNQuilt's fix it friend, and Stitch Check is Snip's favourite job.
Here is how it works. Snip asks for a few photos: the stitches from the top, the underside, a sharp close up, and your machine's threading. Pip reads them for tension balance, the stitch line and skipped stitches, then Snip hands you a fix checklist in the order the fix most likely lives, from rethreading with the foot up to needle, thread and tension. Tick each step off as you go. The result says which of your machines it was checked for, straight from your Studio, and one tap opens the matching lesson, like Threading.
In the screenshot below, Pip read a denim pocket: tension close to balanced, no skipped stitches, and a stitch line that drifts from the pocket edge. The checklist starts with "Rethread top and bobbin with the foot up" and a fresh jeans or topstitch needle. Clear and kind, every time.
Want to learn it properly? Mabel's Machine School has short lessons on threading, the bobbin, "Tension made simple" with the two colour test, needles, presser feet, cleaning the bobbin area, and oiling when your manual says so. Add your machine to your Studio to keep its maintenance log in one place. And when a question doesn't fit a checklist, Ask Pip with a photo.
Stitch Check comes with SewNQuilt Pro: weekly, monthly or yearly plans ($49.99 a year in the US). Get SewNQuilt and keep Snip beside your machine.
FAQ
Why is my thread bunching underneath the fabric?
Almost always because the top thread is not in the tension discs, usually because the machine was threaded with the presser foot down. Raise the foot, rethread the top completely, and check the bobbin sits in its case as your manual shows. Hold the tails for the first stitches.
Should I adjust the bobbin tension to fix loops underneath?
No. Loops underneath come from the needle thread, so fix the top first: rethread with the foot up, then raise the needle tension one step if needed. Adjust the bobbin case only as a last resort, in tiny turns, after marking the screw's starting position.
Why does my sewing machine skip stitches?
The most common causes are a worn needle, the wrong needle type for the fabric (a Universal on elastic knits instead of a Stretch 75/11 or 90/14), or a needle that is not pushed fully up with the flat side to the back. If skipping continues with a correct new needle, the timing may need a technician.
Why does my thread keep breaking?
Check the threading, then the needle (a burr or an eye too small for the thread), then the spool (a notch catching the thread), then the tension, then the age of the thread. A Topstitch needle with its long eye helps heavy and specialty threads.
Why does my needle keep breaking?
Pulling or pushing the fabric, hitting pins, using a needle too fine for the layers, or a twin needle hitting the plate. If needles break with the right needle and no pulling, the timing may be off, and a technician can reset it.
What number should my tension dial be on?
Many machines mark a default setting on the dial or in the manual, and most sewing happens at or near it. Find your setting with a two colour test on a folded scrap of your fabric. If you end up at either extreme, rethread and check the bobbin and needle instead.
Why does it only nest at the start of the seam?
Usually the thread tails were not held, the needle was not at its highest point when you started, or a thin fabric corner was pushed into the needle plate. Hold both tails for 2 or 3 stitches, start with the needle up, and begin 1/4 in (6 mm) in from the edge.
How do I convert stitches per inch to millimetres?
Divide 25.4 by the number. 10 stitches per inch is 2.5 mm, 12 is about 2.1 mm and 8 is about 3.2 mm. In the other direction, divide 25.4 by the length in mm.
Related guides
- Sewing machine needle size chartRead the guide
- Sewing for beginners: your first weekRead the guide
- Seam allowance for sewing and quiltingRead the guide
- How to make your first quilt, start to finishRead the guide
- Half square triangles: sizes and all four methodsRead the guide
- Seam allowance converter (free tool)Open the tool
Sources
- SCHMETZ, FAQs (when to change the needle, needle breakage, timing, twin needles, pins, thread shredding). https://www.schmetzneedles.com/pages/faqs (checked 31 Oct 2026)
- SCHMETZ, ABC Pocket Guide (needle and fabric recommendations). https://www.allbrands.com/images/Barbara/ABC-brochure.pdf (checked 31 Oct 2026)
- SCHMETZ, home sewing needle catalog (Stretch, Jeans, Topstitch and Microtex needles). https://www.schmetzneedles.com/collections/all-sewing-machine-needles (checked 31 Oct 2026)
- ISO 4915:1991, Textiles: Stitch types, classification and terminology (lockstitch class 300, type 301). https://www.iso.org/standard/10932.html (checked 31 Oct 2026)
- ASTM D6193, Standard Practice for Stitches and Seams. https://www.astm.org/d6193-16r20.html (checked 31 Oct 2026)
- Coats, Basic stitch types. https://www.coats.com/en/info-hub/basic-stitch-types/ (checked 31 Oct 2026)
- Coats, Thread numbering. https://www.coats.com/en/info-hub/thread-numbering/ (checked 31 Oct 2026)
Image credits
- Hero: Neil Yonamine on Pexels, https://www.pexels.com/photo/a-person-using-a-sewing-machine-11019760/ (ID 11019760).
- Tension, threading, bobbin case and needle drawings and the stitch length chart: SewNQuilt.
- Screenshot: SewNQuilt app.