
Most beginner guides hand you a tool list and nine vague steps. This one hands you a quilt. Below is one complete plan for a first throw quilt made of simple squares, with every number worked out: how many squares, how much fabric of each print, the border, the backing, the batting and the binding. You get it twice, once planned in inches and once planned natively in centimetres, because a metric quilt is not an imperial quilt converted piece by piece.
Squares are the right first quilt. There are no points to match, no bias edges to stretch and no triangles to trim. Every skill you learn here (accurate cutting, a true quarter inch seam, pressing, nesting, borders, basting, quilting and binding) carries straight into every quilt you make afterwards.
The plan at a glance: your first quilt cutting plan and shopping list
| What | Imperial plan | Metric plan (native) |
|---|---|---|
| Finished square | 6 in | 15 cm |
| Cut square (finished + 2 seams) | 6 1/2 in | 16.5 cm |
| Seam allowance | 1/4 in | 0.75 cm |
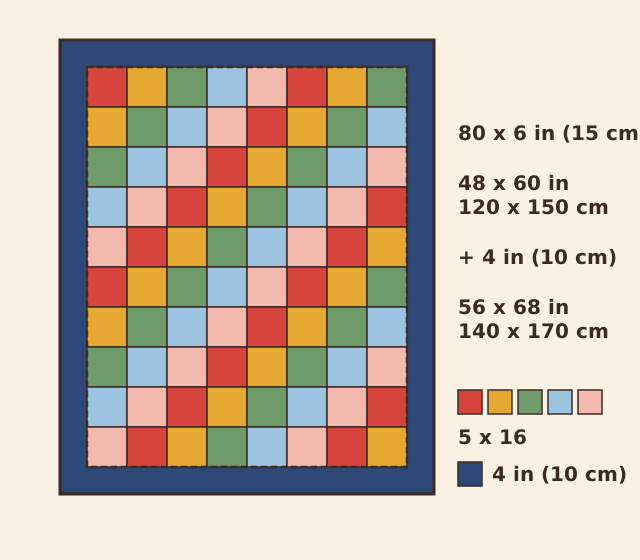
| Layout | 8 across, 10 down: 80 squares | 8 across, 10 down: 80 squares |
| Centre, finished | 48 x 60 in | 120 x 150 cm |
| Border, finished (cut) | 4 in (cut 4 1/2 in) | 10 cm (cut 11.5 cm) |
| Finished quilt | 56 x 68 in | 140 x 170 cm |
| Prints for squares | 5 prints, 16 squares each: 5/8 yd each | 5 prints, 16 squares each: 60 cm each |
| Border and binding fabric | 1 1/2 yd | 1.4 m |
| Backing (horizontal seam) | 3 1/2 yd of 42 to 44 in cotton, or 1 3/4 yd of 108 in wide back | 3.2 m of 107 to 112 cm cotton, or 1.6 m of 274 cm wide back |
| Batting | at least 62 x 74 in | at least 156 x 186 cm |
| Binding | 7 strips 2 1/2 in x WOF | 7 strips 6.5 cm x WOF |
WOF means width of fabric, selvage to selvage. All yardage uses a usable width of 40 in (102 cm) after the selvages are trimmed from 42 to 44 in (107 to 112 cm) quilting cotton, the safe default for planning. North American shops cut in 1/8 yd steps (4.5 in); shops in metric countries cut in 10 cm steps, so each plan rounds the way your shop sells.
A finished size of 56 x 68 in (140 x 170 cm) sits right inside the usual throw range of 50 x 65 to 60 x 72 in (125 x 165 to 150 x 180 cm): big enough for the sofa, small enough to quilt on a home machine. For other sizes, see our quilt size chart.
How do you work out the fabric for a first quilt?
Every number above comes from a handful of simple rules. Learn them once and you can plan any square quilt yourself.
Why is each square cut 6 1/2 in for a 6 in finish?
Every edge of a square loses one seam allowance when it is sewn to its neighbour. Two edges across means two allowances: 6 in + 1/4 in + 1/4 in = 6 1/2 in. In metric the convention is a 0.75 cm seam, so a 15 cm square is cut 15 + 0.75 + 0.75 = 16.5 cm. Notice that 16.5 cm is not 6 1/2 in converted (that would be 16.51 cm); it is its own native plan. Mixing the two systems is the fastest way to a quilt that will not lie flat.
How much fabric for 16 squares of each print?
The yardage rule for squares works strip by strip:
- Squares per strip = usable width divided by cut size, rounded down.
- Strips = squares needed divided by squares per strip, rounded up.
- Fabric = strips x cut size, plus a little for straightening and shrinkage, rounded up to what the shop sells.
Imperial: 40 / 6 1/2 = 6.15, so 6 squares per strip. 16 / 6 = 2.67, so 3 strips. 3 x 6 1/2 in = 19 1/2 in. Add 3 in for straightening: 22 1/2 in, which is exactly 5/8 yd. Buy 5/8 yd of each print.
Metric: 102 / 16.5 = 6.18, so 6 squares per strip. 3 strips x 16.5 cm = 49.5 cm. Add 5 cm: 54.5 cm. Round up to the next 10 cm: buy 60 cm of each print.
You will have two spare squares per print. Keep them. They are your test squares, your replacement for the one you cut wrong and, later, the start of a matching cushion.
How much fabric for the border?
Border strips are cut 4 1/2 in (11.5 cm) wide, the 4 in (10 cm) finish plus two seams. The side borders run the length of the centre, 60 1/2 in raw (151.5 cm). The top and bottom run across the centre plus both side borders, 56 1/2 in (141.5 cm). In total you need 234 in (586 cm) of border strip.
Strips longer than your fabric is wide are joined end to end, and each 45 degree join uses up one strip width, 4 1/2 in (11.5 cm). Six strips would come up short once the joins are taken out (6 x 40 in minus 5 x 4 1/2 in = 217 1/2 in); seven strips give you 7 x 40 in minus 6 x 4 1/2 in = 253 in (645 cm) after joining, with room to spare. That is 7 x 4 1/2 in = 31 1/2 in of fabric (7 x 11.5 cm = 80.5 cm).
How much fabric for the binding?
Binding length = perimeter + 10 in (25 cm) for the corners and the final join. Perimeter: 2 x (56 + 68) = 248 in, so 258 in of binding. 258 / 40 = 6.45, so 7 strips of 2 1/2 in = 17 1/2 in of fabric. Metric: 2 x (140 + 170) = 620 cm + 25 cm = 645 cm. 645 / 102 = 6.3, so 7 strips of 6.5 cm = 45.5 cm.
Our tip: buy the border and the binding in the same fabric, in one cut. Imperial: 31 1/2 + 17 1/2 + 3 in for straightening = 52 in, rounded up to 1 1/2 yd (54 in). Metric: 80.5 + 45.5 + 5 cm = 131 cm, rounded up to 1.4 m. A binding that matches the border frames the quilt like a picture mount, and you only cut one fabric. The full method lives in our binding guide.
How big should the backing and batting be?
For quilting on a home machine, the backing and batting extend 2 to 3 in (5 to 8 cm) beyond the top on every side; longarm quilters ask for 4 in (10 cm). For a first quilt use the generous end: 3 in (8 cm) each side, because a beginner's sandwich shifts a little as it is quilted.
Imperial: 56 + 6 = 62 in wide, 68 + 6 = 74 in long. Two widths of cotton are needed either way. Seams running across (horizontal) use 2 panels of 62 in = 124 in, buy 3 1/2 yd. Seams running down (vertical) use 2 panels of 74 in = 148 in, 4 1/8 yd. Choose horizontal and save 5/8 yd. A 108 in wide back needs a single length of 62 in: buy 1 3/4 yd.
Metric: 140 + 16 = 156 cm wide, 170 + 16 = 186 cm long. Horizontal: 2 panels of 156 cm = 312 cm, buy 3.2 m. Vertical: 2 panels of 186 cm = 372 cm. Choose horizontal. A 274 cm wide back needs one length of 156 cm: buy 1.6 m.
Trim off the selvages before you sew the panels together, and press the backing seam open. The quilt backing guide shows the seam options side by side.
Batting is cut to the backing size: at least 62 x 74 in (156 x 186 cm). Packaged batting is sold by bed size; most brands' twin packages measure about 72 x 90 in, which covers this quilt with a strip left over for a mug rug (check the label, sizes vary by a few inches).
Which batting should a beginner choose?
Two good choices, and the deciding number is the maximum quilting distance: the biggest unquilted space the maker allows before the fibres can shift in the wash.
| Batting | Example | Max quilting distance | What it means for this quilt |
|---|---|---|---|
| 80/20 cotton and polyester | Hobbs Heirloom Premium 80/20 | 4 in (10 cm) | Quilt a 3 in (7.5 cm) grid: a line in every seam and through the middle of every square |
| 100% cotton with scrim | Warm & Natural (The Warm Company) | 10 in (25 cm) | A 6 in (15 cm) grid in the seams alone is plenty |
Our pick for a first quilt is 80/20. It is soft, drapes well, washes into a gentle crinkle and forgives a slightly uneven line. If you would rather quilt fewer lines, choose cotton with scrim and quilt only in the seams. Expect cotton battings to shrink about 3 to 5 percent in the first wash if they were not prewashed; that shrinkage is what gives a quilt its cosy, crinkled look.
What tools do you need to make a quilt?
| Tool | Size or type | Why |
|---|---|---|
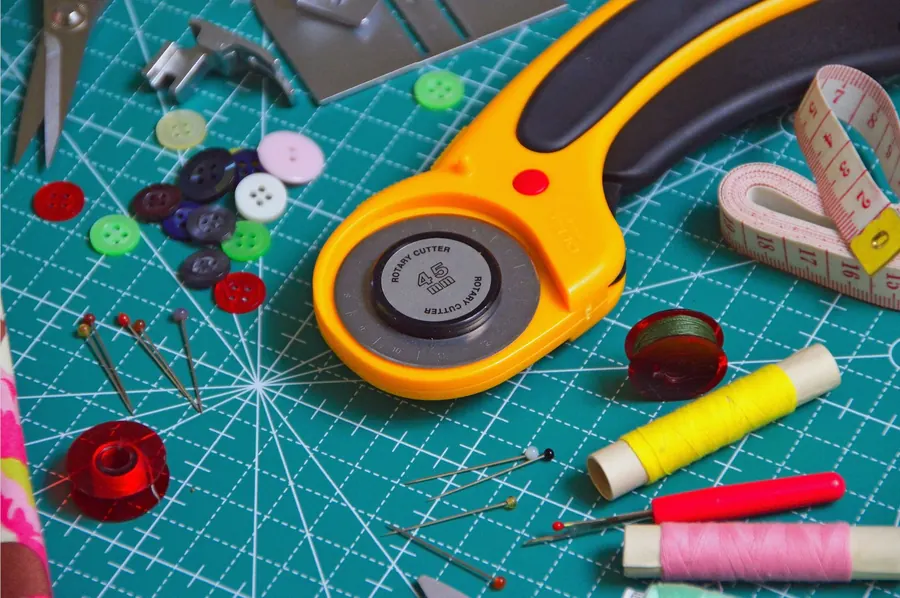
| Rotary cutter | 45 mm | The standard size: cuts four layers of cotton cleanly |
| Self healing mat | at least 18 x 24 in (45 x 60 cm) | Holds a folded width of fabric in one go |
| Rotary ruler | 6 1/2 x 24 in, marked in 1/8 in (metric: 15 x 60 cm, marked in mm) | The 6 1/2 in width cuts your square strips in one pass |
| Square ruler | about 12 in (30 cm) | Squares up blocks; in the metric plan it cuts the 16.5 cm strips, which are wider than a 15 cm ruler |
| Sewing machine | straight stitch, with a 1/4 in foot if you have one | Piecing |
| Walking foot | fits your machine | Feeds three layers evenly for straight line quilting |
| Machine needles | 80/12 universal or quilting for piecing; 90/14 quilting or topstitch for quilting | Matched to the thread |
| Thread | 50 wt cotton for piecing; 40 or 50 wt for quilting | Fine thread keeps seams flat |
| Curved safety pins | size 1 or 2, about 250 | Pin basting |
| Iron | cotton setting | Pressing |
| Masking tape | any | Taping the backing, marking a seam guide |
Step by step: how to make your first quilt
Step 1: Choose and prepare your fabric
Choose 100% quilting cotton. It presses crisply, holds its shape and does not stretch as you sew. For the five prints, mix values: one or two lights, a medium or two, one dark. Squint at the stack; if every print turns into the same grey blur, swap one. Value contrast is what makes the diagonal stripes sing, far more than colour.
To prewash or not? Both are right, as long as you choose one for the whole quilt. Prewash deep reds, indigo, batiks and hand dyes, and test them for bleeding. Prewash if you want a flat, smooth finish. Skip prewashing if you love the antique crinkle that unwashed cotton gives after the first wash, and never prewash precuts, which fray and shrink unevenly. Quilting cotton can shrink a few percent, which is the reason every yardage figure above includes a little extra. Whichever you choose, wash the finished quilt the first time with a colour catcher sheet.
Press every fabric before you cut. Wrinkles turn into wrong sizes.
Step 2: Cut accurately with a rotary cutter
- Fold the fabric selvage to selvage so the fold hangs without ripples, then fold again so four layers lie flat on the mat.
- Square up: lay a horizontal ruler line exactly on the fold and trim the ragged edge. This first cut must be at a true right angle to the fold.
- Cut strips 6 1/2 in (16.5 cm) wide, measuring with the ruler lines, never the mat lines. The mat is for protecting the table.
- Recut your straight edge every three or four strips. If a strip opens out with a "V" at the fold, the fold was not square: straighten and carry on.
- Subcut each strip into squares: 6 per strip, 16 per print.
- Stand up, spread your fingers on the ruler, cut away from your body in one steady stroke and close the blade guard after every single cut.
Left handed? Mirror every instruction: the ruler sits to your right of the cut.
Step 3: Test your quarter inch seam before you sew a single square
Here is the step most beginner guides skip, and the one that decides whether your quilt lies flat. The quilting seam is 1/4 in (0.75 cm in metric patterns). It sounds small, and it is: a seam just 1/32 in too wide, repeated across seven seams in a row, makes the row 7/16 in short. Now do that on every row, and your border will never fit.
The seam accuracy test:
- Cut three strips 1 1/2 x 3 1/2 in (4 x 9 cm in metric).
- Sew them together along the long edges with your quarter inch seam.
- Press both seams away from the centre strip.
- Measure. The unit must be exactly 3 1/2 in (9 cm) wide, and the centre strip must show exactly 1 in (2.5 cm).
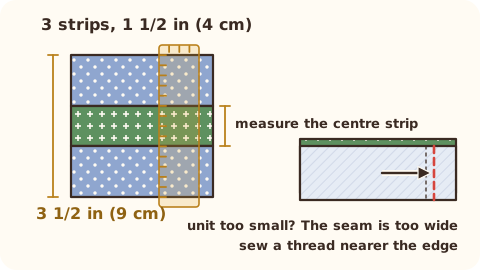
Narrower than 3 1/2 in? Your seam is too wide. Sew a scant quarter inch: one or two thread widths inside the 1/4 in line (in metric, about 1 mm inside 0.75 cm). The scant seam makes up for the tiny bit of fabric that disappears into the fold when a seam is pressed to one side. Mark the line that works with a stack of masking tape or a magnetic seam guide on the bed of the machine, and test again until it measures true.
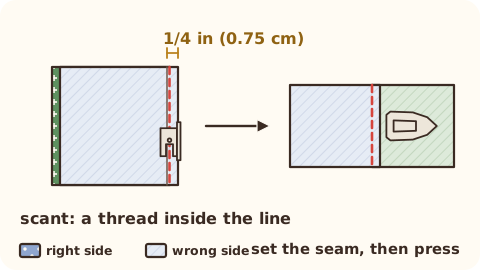
Set the stitch length to 2.0 to 2.2 mm, about 12 stitches per inch. Short stitches hold when later seams cross them, so piecing seams need no backstitching. Fit an 80/12 universal or quilting needle with 50 wt cotton thread.
Step 4: Lay out the squares and chain piece the rows
Lay all 80 squares out on the floor or a bed in 10 rows of 8, following the diagonal colour order in the layout chart. Take a photo. That photo is your map when the cat rearranges everything.
Chain piecing turns an afternoon of sewing into an hour:
- Pick up square 1 and square 2 of every row, stacking them right sides together beside the machine, all facing the same way.
- Start on a folded scrap (a leader) so the machine does not chew the first corner.
- Sew the first pair, and without lifting the foot or cutting the thread, feed the next pair right behind it.
- Keep going to make a chain of pairs joined by short threads. Snip them apart only when you are ready to press.
- Add square 3 to each pair the same way, then 4, and so on, until all ten rows have eight squares.
Keep each row in order. A safety pin with a paper tag (row 1, row 2) costs nothing and saves a lot of unpicking.
Step 5: Press toward the dark and nest the seams
Pressing is half of piecing. Set the iron to cotton (three dots, up to 210 °C or 410 °F under ISO 3758:2023).
- Set the seam: press it flat exactly as sewn, to sink the stitches into the fabric.
- Open the top square and press from the right side.
- Press, do not iron. Lift and lower the iron. Sliding it back and forth stretches the fabric and your squares stop being square.
- Go easy on steam with pieced units; it can distort them.
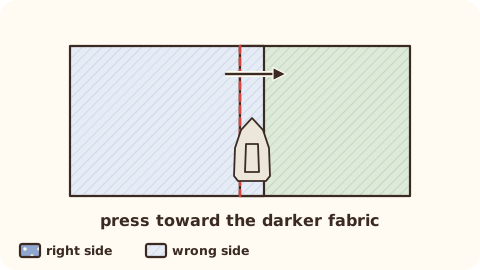
Here is the trick that makes corners meet: press the seams of odd rows to the right and even rows to the left. When you lay row 1 on row 2, the seam allowances face opposite ways and butt snugly against each other. This is called nesting. Pin right through each intersection, and the corners of your squares will match as if by magic. Where pressing to the right sends an allowance under a lighter square, that is fine on a squares quilt; the alternating direction matters more here than the darker fabric rule.
Join the rows in pairs (1 to 2, 3 to 4), then join the pairs. Press the long row seams in one direction, or open if you prefer a flatter top. Your centre should now measure 48 1/2 x 60 1/2 in (121.5 x 151.5 cm), raw edge to raw edge.
Step 6: Add borders measured through the centre
This is where many first quilts get wavy edges, and the fix is one tape measure away.
- Measure the length of the quilt through the centre and along both sides. If they differ by less than 1/2 in (1.25 cm), use the centre measurement.
- Cut two side borders to that length: for this plan 4 1/2 x 60 1/2 in (11.5 x 151.5 cm). Join strips with a 45 degree seam where needed.
- Pin each border at both ends and in the middle, then every few inches in between, easing the quilt to fit. Sew, then press toward the border.
- Measure the width through the centre, including the new side borders, and cut the top and bottom: 4 1/2 x 56 1/2 in (11.5 x 141.5 cm). Sew and press toward the border.
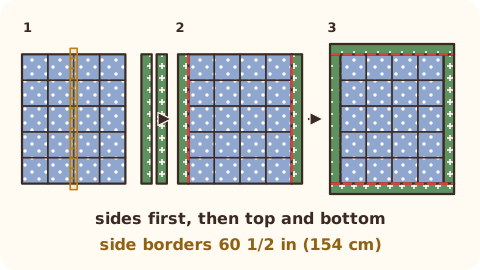
Never sew a long strip on and simply chop off the excess. Edges stretch as you handle them, so an unmeasured border is always a little too long, and a too long border ripples.
Your finished top measures 56 1/2 x 68 1/2 in raw (141.5 x 171.5 cm), which becomes 56 x 68 in (140 x 170 cm) once the binding seam is sewn. Take a moment. You made a quilt top.
Step 7: Make the quilt sandwich and baste
The quilt sandwich is three layers: backing, batting and top. Basting holds them together while you quilt so nothing shifts.
- Press the backing and the top. Unfold the batting a day ahead so the creases relax.
- Tape the backing to a clean floor or a large table, wrong side up, taut but not stretched. Work from the middle of each side outward.
- Smooth the batting over it.
- Lay the top right side up in the middle, with 3 in (8 cm) of batting and backing showing on every side.
- Pin baste with curved safety pins (size 1 or 2) every 3 to 4 in (8 to 10 cm), about a fist apart, starting in the centre and working outward. At 4 in (10 cm) spacing this quilt takes about 240 pins.
- Keep pins off the lines you plan to quilt, so place them in the middle of the quarters of each square, not on the seams.
- Close the pins. A grapefruit spoon or a pin closing tool saves your fingertips.
Other basting methods work well too. Spray basting uses a temporary textile adhesive, sprayed in a ventilated room and smoothed down in sections; it washes out. Thread basting is a grid of long running stitches 4 in (10 cm) apart, the traditional choice for hand quilting. For a first throw, pins are the calmest choice: you can reposition anything.
Step 8: Quilt it with a walking foot
Straight lines with a walking foot are the friendliest way to quilt on a home machine. The foot grips the top layer and moves it in step with the feed dogs underneath, so the layers travel together without pleats.
Set up: walking foot, 90/14 quilting or topstitch needle, 40 or 50 wt thread, stitch length 3.0 mm (anything from 2.5 to 3.5 mm works; longer stitches look crisp on a quilt).
The plan for 80/20 batting (3 in, 7.5 cm grid):
- Roll the right half of the quilt tightly so it fits through the throat of the machine.
- Start at the centre seam. Sew in the ditch: right in the seam line, on the low side of the pressed seam.
- Work outward line by line, alternating the direction of neighbouring lines so the quilt does not skew.
- Add a line through the middle of every column of squares, 3 in (7.5 cm) from each seam. Use the edge of the walking foot or a guide bar to keep the spacing even.
- Repeat across the width. In each border, sew one line down the middle, 2 in (5 cm) from the seam.
- Start and stop each line with three or four tiny stitches, or leave long tails and bury them with a hand needle.
That is 19 lines down and 23 lines across, each running edge to edge, with no unquilted space larger than 3 in (7.5 cm), comfortably inside the 4 in (10 cm) limit of an 80/20 batting. With cotton and scrim (10 in, 25 cm) you may stop after the ditch lines: a 6 in (15 cm) grid plus one border line.
Support the weight of the quilt on the table to your left and behind the machine. A quilt hanging off the edge drags the needle and makes uneven stitches.
Step 9: Bind the quilt
Trim the batting and backing even with the top, keeping the corners square. Then:
- Join the seven 2 1/2 in (6.5 cm) strips end to end with 45 degree seams, press the seams open and press the long strip in half lengthwise, wrong sides together. This is double fold binding, the standard.
- Sew the raw edges of the binding to the front of the quilt with a 1/4 in (0.75 cm) seam, using the walking foot. Start partway along one side, leaving a tail.
- At each corner, stop 1/4 in (0.75 cm) before the edge and backstitch. Fold the binding up at 45 degrees, then down level with the next edge, and sew on from the edge. This makes a mitred corner.
- Join the two ends neatly where they meet.
- Fold the binding to the back and stitch it down by hand with a blind or ladder stitch, or by machine.
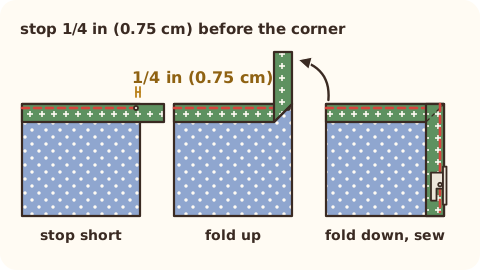
For a first quilt choose 2 1/2 in (6.5 cm) strips over 2 1/4 in: the fuller binding is more forgiving to fold over the edge evenly. Every detail, including joining the ends invisibly, is in our binding guide.
Add a label on the back with your name, the date and where you made it. Then wash it cool on a gentle cycle with a colour catcher sheet and watch it crinkle into a real quilt.
Where to go after your first quilt
The same rhythm (plan, cut, test, piece, press, border, sandwich, quilt, bind) carries every quilt you will ever make. Natural next steps: a four patch or nine patch, which adds nesting inside each block; then half square triangles, the most used unit in quilting (see our half square triangle chart); then flying geese and stars (see our flying geese size chart). To build a quilt from precuts instead of yardage, start with our fat quarter and precut guide.
Common first quilt mistakes and how to fix them
| Mistake | What you see | Fix |
|---|---|---|
| Seam a thread too wide | Rows come out shorter than 48 1/2 in (121.5 cm); border will not fit | Do the three strip test, sew a scant quarter inch, mark the line with tape |
| Cutting with mat lines | Squares vary by 1/8 in (3 mm) or more | Measure with the ruler lines only; check one square of each strip |
| Fold not square | Strips open into a "V" | Refold, square the edge again, recut the edge every 3 or 4 strips |
| Ironing instead of pressing | Rippled, stretched squares | Lift and lower; let units cool flat before handling |
| Seams pressed the same way in every row | Corners do not meet | Odd rows right, even rows left; nest and pin each intersection |
| Borders sewn on unmeasured | Wavy edges | Measure through the centre, cut to that length, pin and ease |
| Backing taped too loose | Tucks and pleats on the back | Tape taut but not stretched; pin every 3 to 4 in (8 to 10 cm) |
| Quilting lines too far apart | Batting shifts or lumps after washing | Keep every gap inside the batting's maximum distance, borders included |
| Quilt dragging off the table | Uneven stitch length, puckers | Support the weight; rolled quilt on your lap or a side table |
| Binding too tight at corners | Corners cup and curl | Stop 1/4 in (0.75 cm) before each corner and fold a true 45 degree mitre |
Make your first quilt with SewNQuilt
You have the plan. Now make it feel easy. SewNQuilt is the sewing and quilting companion built for exactly this moment.
The Sew School quilting path, taught by Mabel, starts with Your first quarter inch seam: rotary cutting, the quarter inch seam, the seam accuracy test, pressing and chain piecing, all finished with a string mug rug you can make in an evening. Then it walks you level by level through Four patch and nine patch, Sandwich and baste, Quilting it, and Borders, sashing and settings. Every lesson has a 5 second replay, slows to 0.5x, loops and mirrors for left handed makers.
When you sew a project, Sew Mode gives you one calm step per screen, each one drawn in your own fabrics, read aloud if you like, with voice commands so you can say "next" with pins in your mouth. Stuck on a step? Tap "I need help" and Ask Pip answers about that exact step. Hexie and Inchy look after the maths: the Quick quilt plan works out backing, binding and batting at once, and the quilt size finder covers 37 mattress sizes, in inches or centimetres.
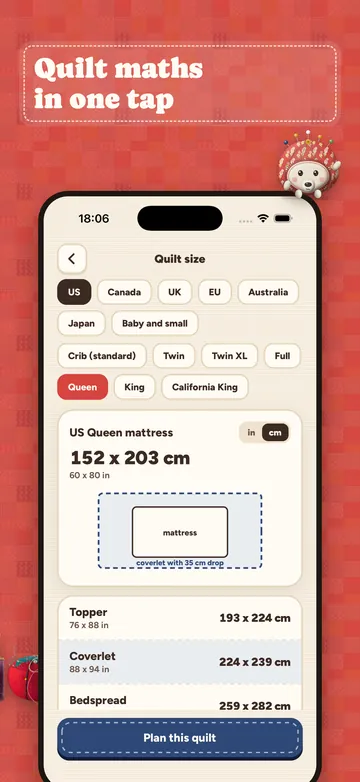
SewNQuilt Pro comes in weekly, monthly or yearly plans ($49.99 a year in the US), on iPhone, iPad and Android. Get SewNQuilt and make the first quilt you will keep forever.
FAQ
What is the easiest quilt for a beginner to make?
A quilt of plain squares, like the 6 in (15 cm) throw on this page. There are no points or bias edges, so every skill goes into accuracy: cutting, the quarter inch seam, pressing and borders. Those same skills carry into every block you make later.
How long does it take to make a first quilt?
Plan on a few weekends rather than one. Cutting and piecing 80 squares takes a relaxed day or two, basting an evening, and quilting and binding another weekend. Speed comes quickly once chain piecing clicks.
Do I need a special machine to make a quilt?
No. Any machine with a good straight stitch pieces a quilt. A 1/4 in foot makes the seam easier, and a walking foot makes straight line quilting smooth on a home machine. A throw of 56 x 68 in (140 x 170 cm) fits comfortably through a standard domestic machine when rolled.
What is a quilt sandwich?
The three layers of a quilt: the backing (wrong side up), the batting in the middle and the pieced top (right side up). The layers are basted together with pins, spray or thread, then quilted so the stitching holds them for good.
How do you baste a quilt without a frame?
Tape the backing wrong side up to a floor or table, taut but not stretched, smooth the batting and the top over it, then pin with curved safety pins every 3 to 4 in (8 to 10 cm), working from the centre out. Spray basting in sections is the other popular frameless method.
Should I prewash fabric for my first quilt?
Either way works if you treat every fabric the same. Prewash deep reds, indigo and hand dyes, and whenever you want a flat finish. Skip it for precuts or if you love the soft crinkle of unwashed cotton after the first wash.
What seam allowance do you use for quilting?
1/4 in in imperial patterns and 0.75 cm in metric patterns, usually sewn as a scant quarter so units finish at the right size after pressing. The three strip test tells you whether your seam is right. Our seam allowance guide covers every quilting allowance.
How much fabric do I need for a beginner throw quilt?
For this 56 x 68 in plan: 5/8 yd each of five prints, 1 1/2 yd for border and binding, 3 1/2 yd of backing and batting at least 62 x 74 in. In metric (140 x 170 cm): 60 cm of each print, 1.4 m for border and binding, 3.2 m of backing and batting at least 156 x 186 cm.
Related guides
- Quilt sizes for every bedRead the guide
- How much fabric for quilt backingRead the guide
- How much binding for a quiltRead the guide
- Seam allowance for sewing and quiltingRead the guide
- Half square triangle chartRead the guide
- Free toolsquilt backing calculator, quilt binding calculator, quilt size chartOpen the tool
Sources
- NIST, SI units: length (1 in = 2.54 cm, 1 yd = 0.9144 m). https://www.nist.gov/pml/owm/si-units-length (checked 31 Oct 2026)
- ISO 3758:2023, Textiles: Care labelling code using symbols (ironing temperatures). https://www.iso.org/standard/74401.html (checked 31 Oct 2026)
- Hobbs Batting, Heirloom Premium 80/20 product information (maximum quilting distance 4 in). https://www.hobbsbatting.com/ (checked 31 Oct 2026)
- The Warm Company, Warm & Natural cotton batting (quilting up to 10 in apart). https://www.warmcompany.com/ (checked 31 Oct 2026)
- Superior Threads, education: thread weights and needles for quilting. https://www.superiorthreads.com/education (checked 31 Oct 2026)
- Quilting Daily, simple block math. https://www.quiltingdaily.com/quilt-blocks-simple-math-part-2 (checked 31 Oct 2026)
- International Quilt Museum, quilt care. https://www.internationalquiltmuseum.org/ (checked 31 Oct 2026)
Image credits
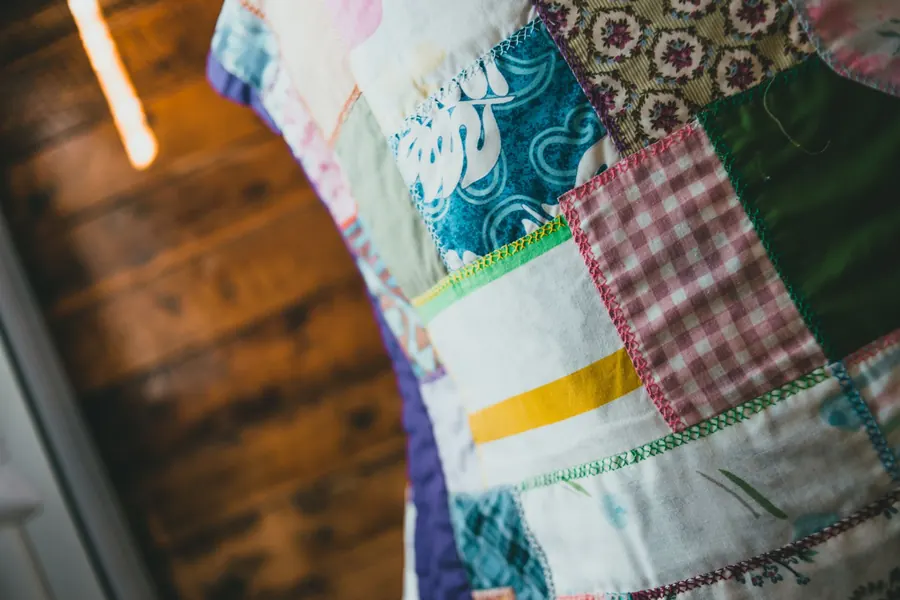
- Handmade patchwork quilt: Erik Mclean on Pexels, https://www.pexels.com/photo/handmade-patchwork-quilt-8266834/ (ID 8266834).
- Rotary cutter on a cutting mat: Adonyi Gábor on Pexels, https://www.pexels.com/photo/assorted-color-sewing-machine-1409217/ (ID 1409217).
- Drawings: SewNQuilt drawing engine. Layout chart: SewNQuilt. Screenshot: SewNQuilt app.