

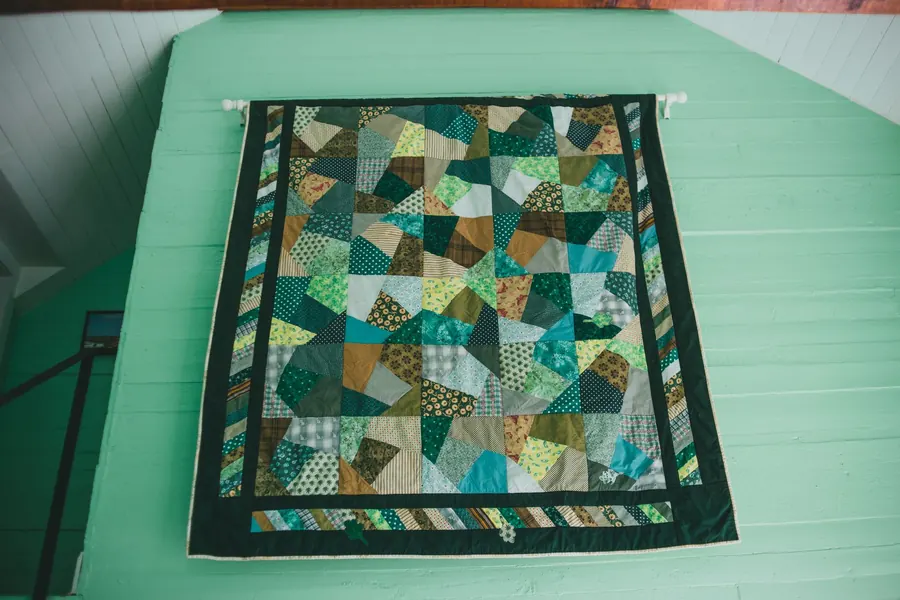
A flying goose is a rectangle with a big triangle (the goose) pointing up and two small triangles (the sky) on either side. A standard goose is twice as wide as it is tall. Line them up and they fly across a border. Turn four of them inward and you have the points of a Sawtooth Star. There are two main ways to make them, and they need completely different cut sizes, which is where most charts let you down. Here are both, side by side, in inches and in centimetres.
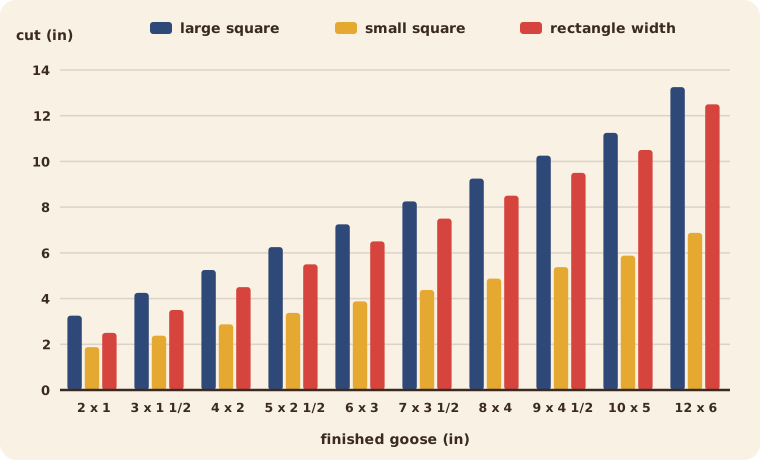
Flying geese size chart (inches)
Finished is the size inside the quilt. Trim to is the size of the unit before it is sewn in: finished + 1/2 in each way.
| Finished goose (w x h) | Trim to (unfinished) | No waste: 1 large square | No waste: 4 small squares | Stitch and flip: 1 rectangle | Stitch and flip: 2 squares |
|---|---|---|---|---|---|
| 2 x 1 in | 2 1/2 x 1 1/2 in | 3 1/4 in | 1 7/8 in | 2 1/2 x 1 1/2 in | 1 1/2 in |
| 3 x 1 1/2 in | 3 1/2 x 2 in | 4 1/4 in | 2 3/8 in | 3 1/2 x 2 in | 2 in |
| 4 x 2 in | 4 1/2 x 2 1/2 in | 5 1/4 in | 2 7/8 in | 4 1/2 x 2 1/2 in | 2 1/2 in |
| 5 x 2 1/2 in | 5 1/2 x 3 in | 6 1/4 in | 3 3/8 in | 5 1/2 x 3 in | 3 in |
| 6 x 3 in | 6 1/2 x 3 1/2 in | 7 1/4 in | 3 7/8 in | 6 1/2 x 3 1/2 in | 3 1/2 in |
| 7 x 3 1/2 in | 7 1/2 x 4 in | 8 1/4 in | 4 3/8 in | 7 1/2 x 4 in | 4 in |
| 8 x 4 in | 8 1/2 x 4 1/2 in | 9 1/4 in | 4 7/8 in | 8 1/2 x 4 1/2 in | 4 1/2 in |
| 9 x 4 1/2 in | 9 1/2 x 5 in | 10 1/4 in | 5 3/8 in | 9 1/2 x 5 in | 5 in |
| 10 x 5 in | 10 1/2 x 5 1/2 in | 11 1/4 in | 5 7/8 in | 10 1/2 x 5 1/2 in | 5 1/2 in |
| 12 x 6 in | 12 1/2 x 6 1/2 in | 13 1/4 in | 6 7/8 in | 12 1/2 x 6 1/2 in | 6 1/2 in |
Yield: one no waste set (1 large + 4 small squares) makes 4 geese. One stitch and flip set (1 rectangle + 2 squares) makes 1 goose.
Flying geese size chart (centimetres)
Metric quilters sew a 0.75 cm seam, so these sizes are worked out natively in centimetres, not converted. The trim size is finished + 1.5 cm each way.
| Finished goose (w x h) | Trim to (unfinished) | No waste: 1 large square | No waste: 4 small squares | Stitch and flip: 1 rectangle | Stitch and flip: 2 squares |
|---|---|---|---|---|---|
| 5 x 2.5 cm | 6.5 x 4 cm | 8.7 cm | 5.1 cm | 6.5 x 4 cm | 4 cm |
| 6 x 3 cm | 7.5 x 4.5 cm | 9.7 cm | 5.6 cm | 7.5 x 4.5 cm | 4.5 cm |
| 8 x 4 cm | 9.5 x 5.5 cm | 11.7 cm | 6.6 cm | 9.5 x 5.5 cm | 5.5 cm |
| 10 x 5 cm | 11.5 x 6.5 cm | 13.7 cm | 7.6 cm | 11.5 x 6.5 cm | 6.5 cm |
| 12 x 6 cm | 13.5 x 7.5 cm | 15.7 cm | 8.6 cm | 13.5 x 7.5 cm | 7.5 cm |
| 15 x 7.5 cm | 16.5 x 9 cm | 18.7 cm | 10.1 cm | 16.5 x 9 cm | 9 cm |
| 16 x 8 cm | 17.5 x 9.5 cm | 19.7 cm | 10.6 cm | 17.5 x 9.5 cm | 9.5 cm |
| 20 x 10 cm | 21.5 x 11.5 cm | 23.7 cm | 12.6 cm | 21.5 x 11.5 cm | 11.5 cm |
| 25 x 12.5 cm | 26.5 x 14 cm | 28.7 cm | 15.1 cm | 26.5 x 14 cm | 14 cm |
| 30 x 15 cm | 31.5 x 16.5 cm | 33.7 cm | 17.6 cm | 31.5 x 16.5 cm | 16.5 cm |
The formulas, in both systems:
- No waste, large square: finished width + 1 1/4 in (metric + 3.7 cm).
- No waste, small squares: finished height + 7/8 in (metric + 2.6 cm).
- Stitch and flip, rectangle: finished width + 1/2 in by finished height + 1/2 in (metric + 1.5 cm each way).
- Stitch and flip, squares: finished height + 1/2 in (metric + 1.5 cm).
Where do 1 1/4 in and 7/8 in come from?
Look closely at a goose. The big goose triangle is a quarter square triangle: a square cut on both diagonals, so its long edge sits on the straight grain. The two sky triangles are half square triangles: a square cut once on the diagonal.
- A quarter square triangle needs an allowance of 1/4 in x (2 + 2 x 1.414) = 1.207 in. The nearest ruler line above it is 1 1/4 in. Its long edge is the goose width, so the large square is width + 1 1/4 in.
- A half square triangle needs 1/4 in x (2 + 1.414) = 0.854 in, used as 7/8 in. Its legs equal the goose height, so the small squares are height + 7/8 in.
In metric, with a 0.75 cm seam, the same geometry gives 3.62 cm (used as 3.7 cm) and 2.56 cm (used as 2.6 cm). That is the whole secret behind every no waste chart. It is also why the formula only works for geese that are twice as wide as they are tall: the sky triangles must fit the goose triangle exactly.
Stitch and flip is simpler. Every piece is a plain square or rectangle, so it gets the usual + 1/2 in (metric + 1.5 cm).
How do you make no waste flying geese?
This is the 4 at a time method. One large square in the goose fabric, four small squares in the sky fabric, four identical geese, and nothing left over.
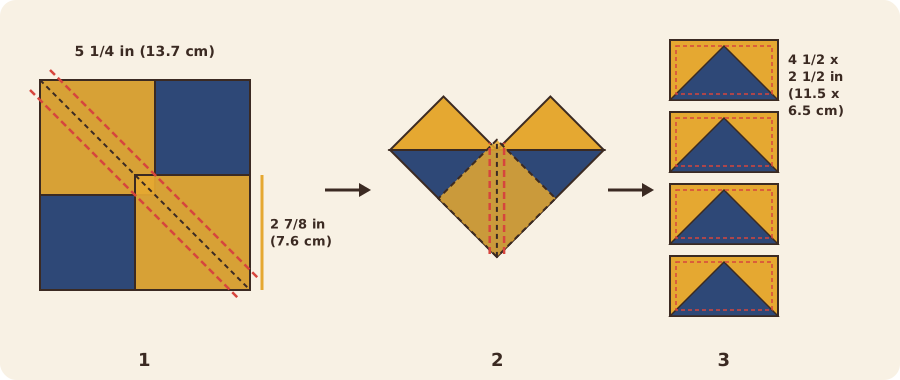
- Cut. For 4 x 2 in geese, cut one 5 1/4 in square of goose fabric and four 2 7/8 in squares of sky fabric (metric 10 x 5 cm: 13.7 cm and 7.6 cm).
- Mark. Draw a diagonal line on the wrong side of all four small squares.
- Place two. Lay two small squares on opposite corners of the large square, right sides together. They overlap a little in the middle, and the drawn lines join into one line from corner to corner of the large square.
- Sew and cut. Sew 1/4 in (0.75 cm) on both sides of the line. Cut on the line.
- Press. Press the small triangles away from the large one. Each piece now looks like a heart.
- Place the third. On each heart, lay a small square right sides together on the remaining corner of the large triangle, with the drawn line running from that corner into the dip between the two small triangles.
- Sew, cut, press. Sew 1/4 in on both sides of the line, cut on the line and press toward the small triangle. You have four geese.
- Trim. Trim each goose to 4 1/2 x 2 1/2 in (11.5 x 6.5 cm) with the point centred, 1/4 in (0.75 cm) below the top edge.
Many quilters cut the large square 1/4 in bigger and the small squares 1/8 in bigger, then trim every goose to size. It costs a few minutes and gives crisp points every time, a very good trade on a first star quilt.
How do you make stitch and flip flying geese?
Also called the folded corners or sew and flip method. One goose at a time, a few small offcuts, and almost nothing that can stretch.
- Cut. For a 4 x 2 in goose, cut one 4 1/2 x 2 1/2 in rectangle (goose) and two 2 1/2 in squares (sky). Metric 10 x 5 cm: one 11.5 x 6.5 cm rectangle and two 6.5 cm squares.
- Mark. Draw a diagonal line on the wrong side of each square.
- First corner. Place a square on the left end of the rectangle, right sides together, with the line running from the top middle of the rectangle down to the bottom left corner. Sew on the line, a thread width toward the corner.
- Trim and press. Trim the corner 1/4 in (0.75 cm) beyond the seam. Press the sky triangle open.
- Second corner. Repeat on the right end, with the line mirrored. The two seams cross exactly 1/4 in below the top edge, at the centre. That crossing is your goose point.
- Check. The goose should measure 4 1/2 x 2 1/2 in. Trim only if it is larger.
Bonus HSTs. Before you trim the corners in step 4, sew a second line 1/2 in toward the corner from the first. Cut between the two lines and you get a tiny bonus half square triangle from every corner. Scrap quilters love these.
How do you trim flying geese accurately?
- Place the goose on the mat, point up.
- Lay a ruler so its vertical centre line runs through the goose point and the 1/4 in line (0.75 cm in metric) sits exactly on the point.
- Check that the ruler's 45 degree lines run along both diagonal seams.
- Trim the top and the right side. Rotate the goose and trim the other two sides to the full trim size.
A dedicated flying geese trimming ruler makes this very fast: its marked diagonals sit on the seams, and both sides are trimmed at once. A standard square ruler with 45 degree lines does the same job with a moment more care.
When the goose is sewn into the block, the 1/4 in seam passes exactly through the point. The point is preserved, not lopped off. If you see a blunt tip, the point was too close to the edge before the seam, or the seam was a little wide.
Which flying geese method is best? A comparison
| No waste (4 at a time) | Stitch and flip (1 at a time) | |
|---|---|---|
| Cut for 4 x 2 in (10 x 5 cm) | 1 square 5 1/4 in (13.7 cm), 4 squares 2 7/8 in (7.6 cm) | per goose: 1 rectangle 4 1/2 x 2 1/2 in (11.5 x 6.5 cm), 2 squares 2 1/2 in (6.5 cm) |
| Geese per set | 4 identical | 1 |
| Fabric waste | none | two corner triangles per goose (or bonus HSTs) |
| Speed for 16 or more geese | fastest | slower |
| Accuracy | very good, best with oversize and trim | excellent, points form exactly 1/4 in below the edge |
| Outer edges | straight grain | straight grain |
| Scrappy geese | 4 matching per set | every goose can differ |
| Best for | Sawtooth Stars, long goose borders, matching sets | beginners, scrappy quilts, a handful of geese |
Our view: learn stitch and flip first. It teaches you where the point lives and it forgives. Switch to no waste the day you need 32 matching geese for a border, and add the small oversize when points matter.
Using flying geese in blocks
Sawtooth Star (12 in, 30 cm)
The classic. Four 6 x 3 in geese make the star points around a 6 in centre. Star fabric A, background fabric B.
| Piece | Inches (12 in block) | Centimetres (30 cm block) |
|---|---|---|
| Centre, fabric A | 1 square 6 1/2 in | 1 square 16.5 cm |
| Sky (star points), fabric A | 4 squares 3 7/8 in | 4 squares 10.1 cm |
| Goose, fabric B | 1 square 7 1/4 in | 1 square 18.7 cm |
| Corners, fabric B | 4 squares 3 1/2 in | 4 squares 9 cm |
Make four no waste geese (B goose, A sky) and trim them to 6 1/2 x 3 1/2 in (16.5 x 9 cm). Sew three rows: corner, goose, corner; goose, centre, goose; corner, goose, corner. The geese point in toward the centre square, with their bases on the outer edge of the block, so the star points fan out from the centre. The block measures 12 1/2 in (31.5 cm) unfinished.
Wild Goose Chase and goose borders
Wild Goose Chase quilts run long lines of geese, often between sashing strips. Plan them by count: 4 x 2 in geese stack 2 in tall each, so a 48 in finished column needs 24 geese, which is six no waste sets. In metric, 10 x 5 cm geese need 24 geese for a 120 cm column, again six sets. Make every set from a different fabric pair and the column becomes a scrappy flock with almost no extra cutting.
A goose border works the same way. Measure the quilt through the centre, divide by the goose height, and round to a whole number of geese. If the math lands between two numbers, change the goose size or add a small spacer at each end rather than squeezing the geese.
Flying geese mistakes and fixes
- Using the no waste formula on a goose that is not 2:1. The 1 1/4 in and 7/8 in rule only works when the width is twice the height. For other shapes, use stitch and flip or a pattern made for that ratio.
- Mixing up width and height. The large square follows the width, the small squares follow the height. A 6 x 3 in goose uses 7 1/4 in and 3 7/8 in, never the reverse.
- Sewing on the wrong side of the line in stitch and flip. Sew a thread toward the corner, so the folded triangle reaches the edge of the rectangle.
- Cut off points. The point must sit 1/4 in (0.75 cm) below the top edge before you sew the goose in. Trim with the 1/4 in line on the point, not the edge of the ruler.
- Geese finish small. Check your seam with the quarter inch test: three 1 1/2 x 3 1/2 in strips sewn together must measure 3 1/2 in wide (metric: three 4 x 9 cm strips measure 9 cm).
- Pressing that stretches the bias. The inside seams of no waste geese are on the bias. Press straight down; do not glide the iron.

Your geese, counted and cut in SewNQuilt
Flying geese are such happy units. SewNQuilt makes them even happier. The HST and units calculator works out no waste flying geese for any size and any count, in inches or centimetres: the large and small squares, how many sets, and the fabric to buy. It does half square triangles, quarter square triangles and square in a square too.
Then go further. The block library holds 164 quilt blocks, from Sawtooth Star to Wild Goose Chase, with cut lists in both units where a standard construction exists. Lay your favourites out in the Quilt Planner, recolour them in your fabrics and get the yardage for the whole top. Hexie loves a good flock.
FAQ
What size squares for 4 x 2 inch flying geese?
For no waste geese, cut one 5 1/4 in square and four 2 7/8 in squares; they make four geese. For stitch and flip, cut one 4 1/2 x 2 1/2 in rectangle and two 2 1/2 in squares per goose. Trim to 4 1/2 x 2 1/2 in.
What is the formula for no waste flying geese?
Large square = finished width + 1 1/4 in; four small squares = finished height + 7/8 in. In metric, with a 0.75 cm seam, add 3.7 cm and 2.6 cm. The formula works for geese twice as wide as they are tall.
What size flying geese for a 12 inch Sawtooth Star?
The star needs four 6 x 3 in geese. Cut one 7 1/4 in background square and four 3 7/8 in star squares, and trim the geese to 6 1/2 x 3 1/2 in. For a 30 cm star, cut 18.7 cm and 10.1 cm squares and trim to 16.5 x 9 cm.
How far from the edge should the flying geese point be?
The point sits 1/4 in (0.75 cm) below the top raw edge, centred. When you sew the unit in with a 1/4 in seam, the stitching passes exactly through the point and it stays sharp.
Which is better, no waste or stitch and flip flying geese?
No waste is faster and wastes nothing when you need many matching geese. Stitch and flip is simpler, very accurate and ideal for scrappy geese or just a few units. Both give straight grain outer edges.
How do I make flying geese bigger so I can trim them?
Add 1/4 in to the large square and 1/8 in to the small squares for no waste geese. Make the geese as usual, then trim each one to finished + 1/2 in with the point 1/4 in below the top edge.
Related guides
Sources
- WeAllSew (BERNINA of America), no waste flying geese method and sizes, https://weallsew.com/?p=44302, checked 31 Oct 2026.
- Sweet Red Poppy, "Flying geese quilt block: easy no waste method", https://sweetredpoppy.com/flying-geese-quilt-block-easy-no-waste-method/, checked 31 Oct 2026.
- Quilting Daily, "Quilt blocks: simple math, part 2" (half and quarter square triangle allowances), https://www.quiltingdaily.com/quilt-blocks-simple-math-part-2, checked 31 Oct 2026.
- Quilt Index, historic block documentation (Sawtooth Star, Wild Goose Chase), https://www.quiltindex.org/, checked 31 Oct 2026.
- National Institute of Standards and Technology (NIST), SI units: length (1 in = 2.54 cm exactly), https://www.nist.gov/pml/owm/si-units-length, checked 31 Oct 2026.
Image credits
- Erik Mclean on Pexels, ID 8266836, https://www.pexels.com/photo/patchwork-curtain-in-a-cabin-8266836/
- Diagram and chart: SewNQuilt, built from the chart values on this page.
- Screenshot: SewNQuilt app (real screenshot).