
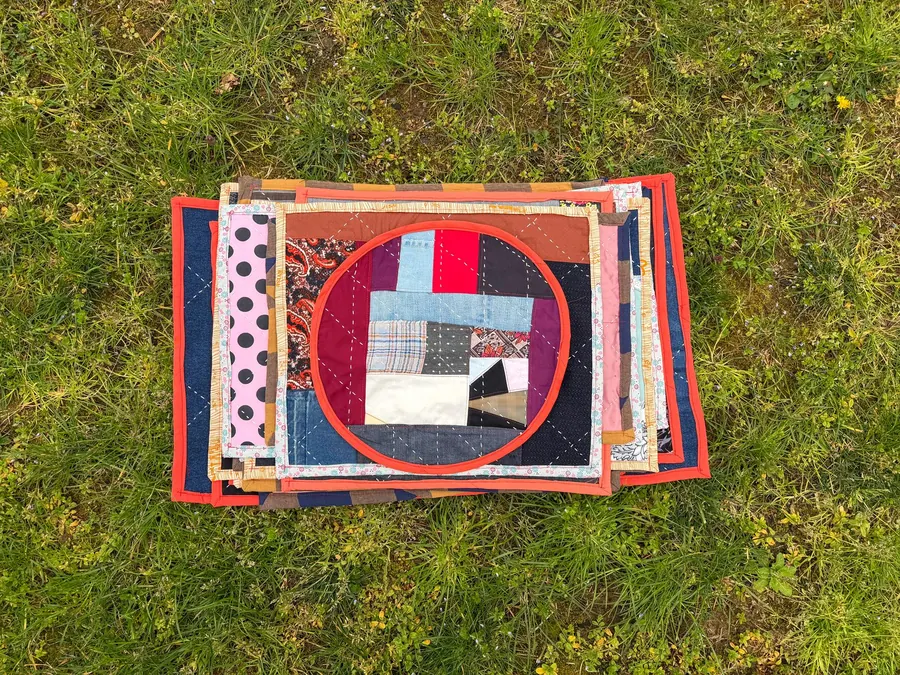
Quilt binding chart: strips and yardage by size
Double fold binding cut across the width of quilting cotton (40 in usable after selvages). Binding length is the perimeter plus 10 in for quilts up to throw size, 12 in for twin to queen and 20 in for very large quilts. Fabric is rounded up to the next 1/8 yd.
| Quilt | Perimeter | Binding length | Strips | 2 1/4 in strips: fabric, buy | 2 1/2 in strips: fabric, buy |
|---|---|---|---|---|---|
| Baby 36 x 36 in | 144 in | 154 in (391 cm) | 4 | 9 in, 1/4 yd* | 10 in, 3/8 yd |
| Crib 36 x 52 in | 176 in | 186 in (472 cm) | 5 | 11 1/4 in, 3/8 yd | 12 1/2 in, 3/8 yd |
| Lap 45 x 55 in | 200 in | 210 in (533 cm) | 6 | 13 1/2 in, 3/8 yd* | 15 in, 1/2 yd |
| Throw 60 x 70 in | 260 in | 270 in (686 cm) | 7 | 15 3/4 in, 1/2 yd | 17 1/2 in, 1/2 yd |
| Twin 70 x 90 in | 320 in | 332 in (843 cm) | 9 | 20 1/4 in, 5/8 yd | 22 1/2 in, 5/8 yd* |
| Full 84 x 90 in | 348 in | 360 in (914 cm) | 9 | 20 1/4 in, 5/8 yd | 22 1/2 in, 5/8 yd* |
| Queen 90 x 95 in | 370 in | 382 in (970 cm) | 10 | 22 1/2 in, 5/8 yd* | 25 in, 3/4 yd |
| King 108 x 95 in | 406 in | 426 in (1,082 cm) | 11 | 24 3/4 in, 3/4 yd | 27 1/2 in, 7/8 yd |
| Cal king 104 x 100 in | 408 in | 428 in (1,087 cm) | 11 | 24 3/4 in, 3/4 yd | 27 1/2 in, 7/8 yd |
* The strips use the cut exactly, with nothing left for a straightening cut. Buy 1/8 yd more if your fabric is off grain or you plan to prewash.
Metric binding chart (6.5 cm and 6 cm strips)
Strips cut across 102 cm usable width. Extra length 25 cm up to throw size, 30 cm for bed quilts and 50 cm for very large quilts. Fabric rounded up to 10 cm. Bed sizes are UK coverlets, a good guide for metric beds.
| Quilt | Binding length | Strips | 6.5 cm strips: fabric, buy | 6 cm strips: fabric, buy |
|---|---|---|---|---|
| Baby 90 x 90 cm | 385 cm | 4 | 26 cm, 30 cm | 24 cm, 30 cm |
| Crib 90 x 130 cm | 465 cm | 5 | 32.5 cm, 40 cm | 30 cm, 30 cm* |
| Lap 115 x 140 cm | 535 cm | 6 | 39 cm, 40 cm | 36 cm, 40 cm |
| Throw 150 x 180 cm | 685 cm | 7 | 45.5 cm, 50 cm | 42 cm, 50 cm |
| Single coverlet 160 x 225 cm | 800 cm | 8 | 52 cm, 60 cm | 48 cm, 50 cm |
| Double coverlet 205 x 225 cm | 890 cm | 9 | 58.5 cm, 60 cm | 54 cm, 60 cm |
| King coverlet 220 x 235 cm | 940 cm | 10 | 65 cm, 70 cm | 60 cm, 60 cm* |
| Super king coverlet 250 x 235 cm | 1,020 cm | 10 | 65 cm, 70 cm | 60 cm, 60 cm* |
* An exact fit again: buy 10 cm more if the fabric needs straightening.
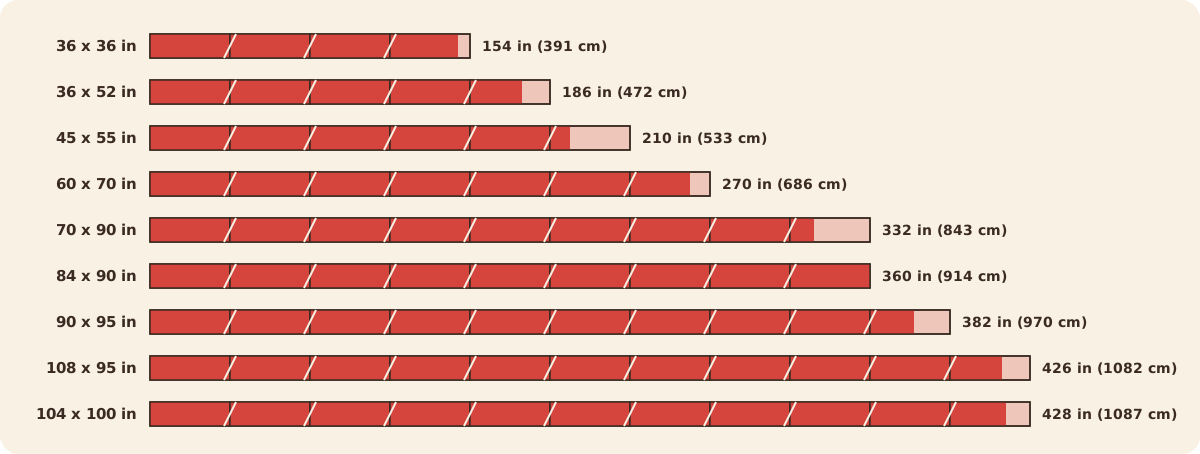
Look at the 84 x 90 in row in the chart: 360 in fills nine strips exactly. The 12 in of extra length is still inside that total, so you are fine, but there is no spare. That is the size where an experienced quilter cuts a tenth strip, just in case.
How do I calculate binding for any quilt?
Four steps, the same ones our binding calculator follows:
- Binding length = 2 x (width + length) + 10 to 12 in (25 to 30 cm). Use 20 in (50 cm) for very large quilts over about 100 in (254 cm) a side. The extra covers the diagonal joins, the four mitred corners and the final join.
- Strips = binding length / 40, rounded up (metric: / 102). Use your real usable width if your fabric is wider.
- Fabric = strips x strip width.
- Buy that length rounded up to 1/8 yd (4 1/2 in) or 10 cm.
Worked example: throw at 2 1/2 in
Quilt 60 x 70 in.
- Perimeter = 2 x (60 + 70) = 260 in. Add 10 in: 270 in.
- 270 / 40 = 6.75, so 7 strips.
- 7 x 2 1/2 in = 17 1/2 in of fabric.
- Buy 1/2 yd (18 in).
Worked example: queen at 2 1/4 in
Quilt 90 x 108 in (a long queen with a pillow tuck).
- Perimeter = 2 x (90 + 108) = 396 in. Add 12 in: 408 in.
- 408 / 40 = 10.2, so 11 strips.
- 11 x 2 1/4 in = 24 3/4 in.
- Buy 3/4 yd (27 in).
Worked example: metric throw at 6.5 cm
Quilt 150 x 180 cm.
- Perimeter = 2 x (150 + 180) = 660 cm. Add 25 cm: 685 cm.
- 685 / 102 = 6.7, so 7 strips.
- 7 x 6.5 cm = 45.5 cm.
- Buy 50 cm.
Plan in one system from start to finish. A 2 1/2 in strip is 6.35 cm, so cutting "6.5 cm" for an inch pattern, or 2 1/2 in for a metric one, changes the finished binding a little. Both are good bindings; just stay consistent along one quilt.
What width should I cut binding strips?
| Binding | Strip width | Finished look | Best for |
|---|---|---|---|
| Double fold, narrow | 2 1/4 in (5.5 to 6 cm) | Snug and crisp, a little slimmer on the front | Thin cotton batting, modern quilts, show quilts |
| Double fold, full | 2 1/2 in (6.5 cm) | Fuller, about 3/8 to 1/2 in on the front | Thicker batting, wool or polyester, first quilts, everyday quilts |
| Single fold | about 1 1/4 in (3.2 cm) | One layer, flat | Miniatures and light wall quilts |
Double fold binding (also called French binding) is the standard. The strip is folded in half lengthwise, so two layers of fabric guard the edge of the quilt. That is why it wears so well.
Our advice for a first quilt: cut 2 1/2 in. It is more forgiving. If your seam drifts a little or your batting is a touch thick, a 2 1/2 in binding still wraps to the back and covers the stitching line. Once you know your machine and your batting, try 2 1/4 in for a slimmer finish.
The rule behind both: the binding should be filled with batting right to its fold. If it feels empty, the strip is too wide for your seam; if it will not reach the stitching line on the back, it is too narrow. Sew a short sample on a scrap sandwich of your real batting when you try a new combination.
Single fold saves fabric but has one layer at the edge. Width depends on your batting thickness, so test a short piece before you commit.
How to bind a quilt, step by step
1. Cut and join the strips
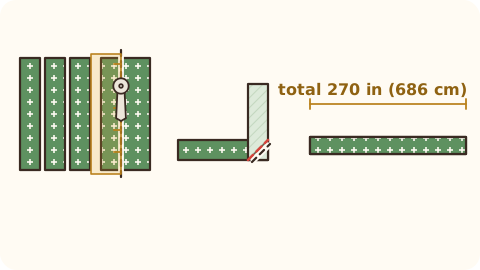
Cut your strips across the width of the fabric. Join them with diagonal seams: lay two strip ends right sides together at a right angle, sew corner to corner, trim to 1/4 in (0.75 cm) and press the seam open. A 45 degree join spreads the bulk along the binding instead of stacking it in one lump, so it disappears once the binding is folded.
2. Fold and press
Fold the long strip in half lengthwise, wrong sides together, and press. Wind it loosely around a card or an empty spool so it does not twist.
3. Trim the quilt and start sewing
Trim the quilt square, cutting the batting and backing level with the top. Start halfway along one side, never at a corner. Leave a tail of 8 to 10 in (20 to 25 cm) unsewn, then sew the raw edges of the binding to the front of the quilt with a 1/4 in (0.75 cm) seam. A walking foot feeds all the layers evenly. Some quilters sew 3/8 in (1 cm) with 2 1/2 in strips for a fuller binding.
4. Mitre the corners
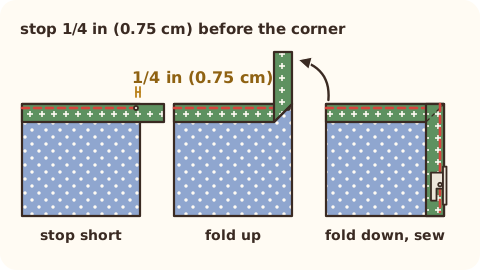
- Stop sewing 1/4 in (0.75 cm) before the corner and backstitch.
- Lift the needle and turn the quilt. Fold the binding straight up, away from the quilt, so the fold makes a 45 degree angle at the corner.
- Fold the binding back down, level with the next edge, with the fold even with the top edge of the quilt.
- Start sewing again from that edge and carry on to the next corner.
When you turn the binding to the back, the fold forms a neat mitre on both sides all by itself.
5. Join the ends
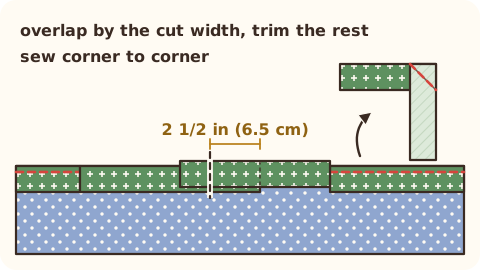
Stop sewing 10 to 12 in (25 to 30 cm) before your starting point. Lay both tails flat along the edge of the quilt. Overlap them by exactly the cut width of your strip (2 1/2 in for 2 1/2 in binding, 6.5 cm for 6.5 cm) and trim off the rest. Open both ends, lay them right sides together at a right angle, and sew corner to corner. Check that the binding lies flat on the quilt before you trim the seam to 1/4 in. Press it open, refold, and sew the last section down.
6. Finish by hand or by machine
Hand finish. Fold the binding to the back so it just covers the machine stitching, hold it with binding clips, and sew it down with a blind or ladder stitch. Invisible from both sides and the classic choice for heirlooms and show quilts. On a throw, it is a calm evening with a good film.
Machine finish. Two ways. Sew the binding to the back first, wrap it to the front and topstitch close to the fold. Or sew it to the front as above, wrap to the back, and stitch in the ditch from the front so the stitches catch the binding underneath. A decorative stitch works beautifully too. Machine finishing is fast and tough, our pick for baby, picnic and dog quilts that will be washed every week.
Bias binding for quilts
Straight grain binding is perfect for straight edges. Bias binding is required for curved or scalloped edges, because only bias stretches enough to ease around a curve without puckering. It also wears longer on edges that get hard use, because no single thread runs along the fold.
Cut bias strips at 45 degrees to the selvage, join them, and apply them exactly like double fold binding. Ease the binding around curves; pin it and let the feed carry it, never pull.
Continuous bias from a square saves cutting and joining many short strips. A square of side S yields roughly S x S / strip width of bias. For 270 in of 2 1/2 in binding, most methods start from about a 27 1/2 in square, and for 685 cm of 6.5 cm binding, about a 70 cm square. Methods differ in how much they lose to seams and ends, so make a test with yours before cutting into a favourite print.
Mistakes and fixes
Starting at a corner. The join lands where it is hardest to hide and the first mitre fights you. Fix: always start halfway along a side.
Binding ends that will not meet. Usually the overlap was wrong. Fix: overlap by exactly the strip width before you trim and join.
Wavy edges. The binding was stretched as it went under the foot. Fix: let the walking foot feed the binding; guide it, do not pull.
Bulky lumps at joins. Straight joins stack every layer of the seam in one spot. Fix: 45 degree joins, pressed open.
A binding that will not reach the stitching on the back. Strip too narrow for the batting or seam. Fix: cut 2 1/2 in (6.5 cm) next time, or sew a scant seam; test on a scrap sandwich first.
Running out by one strip. It happens on sizes that land exactly on a strip, like 84 x 90 in. Fix: buy the rounded yardage in our tables and cut one extra strip when the count is exact.
Bind with SewNQuilt
Inchy loves this part. The binding calculator in SewNQuilt remembers your favourite strip width (2 1/4 in, 2 1/2 in, 6 cm, 6.5 cm or your own) and uses it every time. Enter the quilt size and it tells you the binding length, how many strips to cut and how much fabric to buy, in yards or metres. Curved edge? Choose bias and it works from a square.
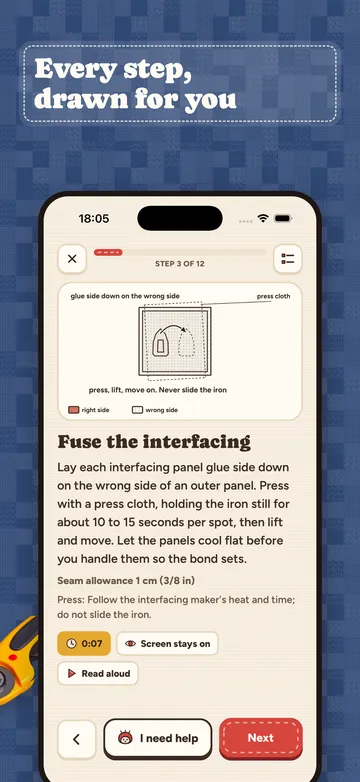
Save it to the project, send the fabric to your shopping list, and when it is time to sew, Sew Mode shows one calm step per screen with every step drawn. Mitres, the final join, all of it. Your binding, your fabric, your finish line.
SewNQuilt is on iPhone, iPad and Android. Get the app.
FAQ
How many binding strips do I need for a queen quilt?
For a 90 x 95 in queen, the binding is 382 in long (370 in perimeter plus 12 in), so you need 10 strips cut across 40 in of usable width. At 2 1/2 in that is 25 in of fabric: buy 3/4 yd.
How wide should I cut quilt binding?
2 1/2 in (6.5 cm) for a full, forgiving binding and 2 1/4 in (5.5 to 6 cm) for a narrow, crisp one. Single fold binding is cut about 1 1/4 in (3.2 cm). Choose by batting thickness and test on a scrap.
How much binding for a baby quilt?
A 36 x 36 in baby quilt needs 154 in of binding: 4 strips. At 2 1/2 in that is 10 in of fabric, so buy 3/8 yd. In metric, a 90 x 90 cm quilt needs 385 cm, 4 strips of 6.5 cm: buy 30 cm.
How many binding strips can I cut from a fat quarter?
A fat quarter is about 18 x 21 in, so 2 1/2 in strips are only about 21 in long. Seven strips give roughly 147 in before joins, plenty for a 24 x 24 in (61 x 61 cm) mini quilt. For anything larger, buy yardage cut across the full width.
Should binding be cut on the bias?
Only when the edge is curved or scalloped, where bias is required. Straight grain binding is the standard for straight edges and uses less fabric. Bias does wear longer, so some quilters choose it for heirloom quilts too.
Do I sew binding to the front or the back first?
For a hand finish, sew to the front and hand stitch on the back. For a machine finish, either sew to the back and topstitch on the front, or sew to the front and stitch in the ditch from the front.
How much extra binding should I add?
Add 10 to 12 in (25 to 30 cm) to the perimeter for joins, corners and the final join, and 20 in (50 cm) for very large quilts.
Related guides
- Quilt sizes chartevery bed and quilt size, in inches and centimetres.Read the guide
- How much fabric for quilt backingthe back, the batting and the wide back question.Read the guide
- How to make a quiltfrom first cut to the final binding stitch.Read the guide
- Fat quarter sizescrappy bindings from your precuts.Read the guide
- Half square triangle chartcut sizes for the units inside the quilt.Read the guide
- Free toolQuilt binding calculatorOpen the tool
Sources
- Fat Quarter Shop, How to bind a quilt (2 1/2 in double fold strips, perimeter plus extra, strips across 40 in, mitred corners). https://www.fatquartershop.com/how-to-bind-a-quilt (checked 31 Oct 2026).
- Missouri Star Quilt Co., The ultimate quilt binding tutorial (extra length, overlapping the tails by the strip width, mitred corners). https://www.missouriquiltco.com/blogs/missouri-star-blog/the-ultimate-quilt-binding-tutorial-step-by-step-guide-with-jenny-doan (checked 31 Oct 2026).
- Moda Fabrics, precuts and fabric widths (fat quarter size). https://my.modafabrics.com/node/29570 (checked 31 Oct 2026).
- The Warm Company, cotton batting loft and care. https://www.warmcompany.com/ (checked 31 Oct 2026).
- Hobbs Batting, batting lofts and care. https://www.hobbsbatting.com/ (checked 31 Oct 2026).
- NIST, SI units of length (1 in = 2.54 cm exactly). https://www.nist.gov/pml/owm/si-units-length (checked 31 Oct 2026).
Image credits
- Bound quilted mats and mini quilts on grass: Canan İldeniz on Pexels (ID 38291841).
- Drawings: SewNQuilt drawing engine.
- Chart: SewNQuilt, built from the binding table on this page.
- Screenshot: SewNQuilt app.