Good fit starts before you buy the pattern. Pattern companies size their patterns by body measurements, not by the letter or number on your favourite jeans, so ten careful minutes with a tape measure decide whether your first make fits or goes back on the cutting table.
This guide follows the body landmarks of ISO 8559-1, the international standard that defines how body measurements for clothing are taken, together with the instructions the pattern companies (Simplicity, McCall's, Butterick, Vogue, Burda and OTTOBRE) print for makers. Every number below is in inches and centimetres.
The essential measurements for sewing
These are the measurements most patterns, alterations and size charts ask for. Take the first four for every project. Add the others when a pattern or a fitting problem calls for them.
| Measurement | Where the tape goes | How to take it | Which garments need it |
|---|---|---|---|
| Height | Floor to the top of the head | Barefoot, heels and shoulder blades against a wall; lay a book flat on your head, mark the wall, measure to the mark | Petite, regular or tall lengths; children's EU sizes |
| High bust | High under the arms, above the bust, straight across the shoulder blades | The tape may angle up slightly at the front; keep it level at the back | Choosing the size for tops when you are fuller than a B cup |
| Bust | Fullest part of the bust, level across the back just under the shoulder blades | Wear the bra you will wear with the garment; read on a normal breath | Tops, dresses, jackets, coats; full bust adjustment |
| Underbust | Directly under the bust, where a bra band sits | Level all round, breathe out normally | Empire seams, fitted bodices, bras and swimwear |
| Chest (men and children) | Fullest part of the chest, under the arms | Level over the shoulder blades, normal breath out, no puffing up | Men's shirts, jackets and coats; children's tops |
| Waist | Natural waist: the narrowest part, where you bend sideways | Tie narrow elastic, bend side to side so it settles, measure over it and leave it on | Waistbands, elastic length, skirts not fitted at the hip |
| High hip | At the hip bones, about 3 to 4 in (7.5 to 10 cm) below the waist | Record the girth and the depth below the waist elastic | Low rise trousers, yoked skirts, tummy adjustments |
| Hip | Fullest part of the seat, usually 7 to 9 in (18 to 23 cm) below the waist | Feet together; check from the side in a mirror; record the depth too | Trousers and skirts fitted through the hip |
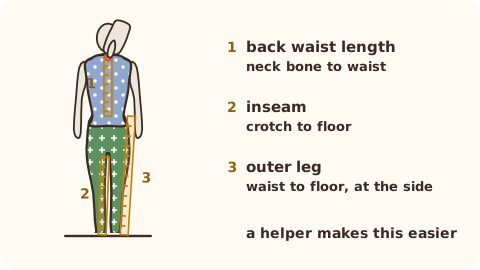
| Back waist length | Prominent neck bone (C7) to the waist elastic at centre back | Helper needed; tape follows the spine | Bodice length, petite sizing |
| Front waist length | Side of the neck, over the bust point, down to the waist | Tape over the fullest part of the bust | Bodice front length, checking an FBA |
| Shoulder to bust point | Side neck point (or mid shoulder) to the bust point | Note which starting point you used | Raising or lowering darts |
| Bust point span | Bust point to bust point | Straight across | Dart and princess seam placement |
| Shoulder length | Side neck point to the bony tip of the shoulder | Find the tip by lifting the arm slightly | Narrow or broad shoulder adjustments |
| Across back | Between the back armpit creases | Helper needed, arms relaxed | Broad or narrow back, sleeve movement |
| Neck base | Over the neck bone at the back and the top of the collarbones at the front | Drape a light chain first to find the line | Necklines, neckbands, hoods |
| Upper arm | Fullest part of the upper arm | Arm relaxed at your side | Sleeve width, full bicep adjustment |
| Arm length | Shoulder tip, over the elbow, to the wrist bone | Arm slightly bent | Sleeve length |
| Wrist | Around the wrist bone | Snug | Cuffs and knit wrist bands |
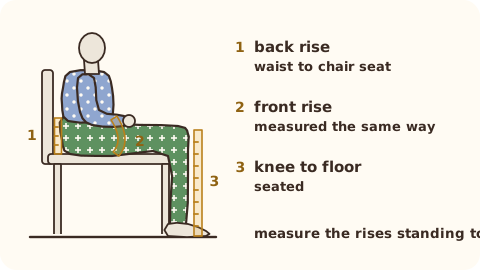
| Crotch depth (seated) | Waist at the side to a hard chair seat | Sit upright on a flat chair; measure with a ruler | Trouser rise |
| Total crotch length | Centre front waist, between the legs, to centre back waist | Helper or a tape pinned at the front | Diagnosing trouser fit |
| Inside leg | Crotch to the floor | Barefoot, or in the shoes you will wear | Trouser length |
| Outside leg | Waist at the side to the floor | Over the waist elastic | Trouser and skirt length |
| Thigh | Fullest part of the upper thigh | Feet slightly apart | Leggings, shorts, full thigh adjustment |
| Head | Forehead, above the ears, around the back of the head | Level, firm | Hats, hoods, pull on necklines |
Why measurements beat your ready to wear size
A Big 4 Misses size 12 is drafted for a body with a 34 in (87 cm) bust, a 26 1/2 in (67 cm) waist and a 36 in (92 cm) hip. Those exact body measurements appear in the 1998 Big 4 fit brochure and in today's Simplicity chart. Pattern sizing has stayed put for decades.
Ready to wear labels are chosen by each brand, so the same number can mean different bodies from one shop to the next. That is why many makers find their pattern size is a bigger number than the one they buy in shops. Nothing is wrong with the pattern or with you. They are two different systems. Pick by your tape measure and the chart, and the pattern will behave the way the designer intended. Our sewing pattern size chart guide puts the Big 4, Burda and OTTOBRE charts side by side.
One more thing to know before you start: these are body measurements. The pattern adds ease on top for movement and style, so never add ease to your own numbers.
How do I measure myself for sewing patterns? The method
What you need
- A flexible tape measure that does not stretch. Check it against a metal ruler once a year; old tapes grow.
- Narrow elastic or a cord to tie at your waist.
- A light chain necklace to find the base of your neck.
- A ruler or hardback book for height and seated crotch depth.
- A full length mirror and, for back measurements, a helper.
Step by step
- Dress for it. Wear the underwear you normally wear, including the bra you plan to wear with the garment. No jumpers, no jeans. Babies are measured over a nappy (diaper).
- Tie the waist elastic. Tie it around your middle, bend from side to side and let it settle at your natural waist. Leave it on. It is the reference line for back waist length, hip depth and every length below.
- Stand naturally. Upright, arms relaxed, weight even, breathing normally. Keep your feet together for the hip. Do not hold in your tummy: the pattern needs the body you will wear it on.
- Get the tension right. Snug, not tight. The tape lies flat without pressing into the body, and one finger slides underneath.
- Keep every girth level. Check the back in the mirror. A tape that dips at the back quietly adds length to every girth.
- Measure the girths from top to bottom: neck base, high bust, bust, underbust, waist, high hip, hip, then arms and legs.
- Measure the lengths with a helper: back waist length from the C7 neck bone to the elastic, shoulder length, across back, arm length, outside and inside leg, and height barefoot against a wall.
- Sit for the rise. On a hard flat chair, measure from the waist elastic at your side straight down to the seat.
- Measure each point twice. If the two readings differ by more than 1/4 in (0.5 cm), take a third and use the middle value.
- Write it down with the date, the units, and what you wore. Round to the nearest 1/4 in or 0.5 cm for choosing a size.
How to measure your bust and high bust
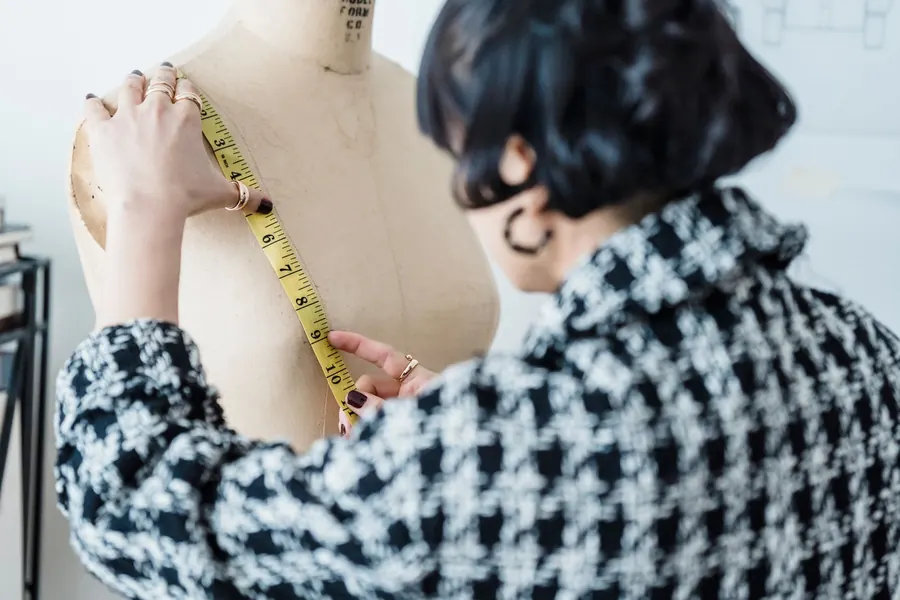
The bust goes around the fullest part of the bust and straight across the back, just under the shoulder blades. Wear the bra you will wear with the garment, because a different bra moves the fullest point.
The high bust sits higher: right up under the arms, above the breast tissue at the front and straight across the shoulder blades at the back. It can tilt up a little at the front. If it slips down onto the bust, it is no longer a high bust.
Why bother with a second bust measurement? Because Misses patterns are drafted for a B cup, about 2 in (5 cm) between bust and high bust. If your difference is larger and you pick the size by full bust, the pattern fits your bust but is too big everywhere else: wide shoulders, a gaping neckline, an armhole that slips. The high bust tracks your frame, so it picks a size that fits shoulders and neck. Then you add room at the bust only.
The 2 1/2 inch (6.3 cm) rule
Subtract your high bust from your bust.
- 2 1/2 in (6.3 cm) or less: choose tops, dresses, jackets and coats by your bust.
- More than 2 1/2 in (6.3 cm): choose them by your high bust and make a full bust adjustment (FBA).
2 1/2 in is exactly 6.35 cm; SewNQuilt shows it as 6.3 cm everywhere. If you land exactly on the line, a quick muslin of the bodice settles it.
Measuring for a full bust adjustment
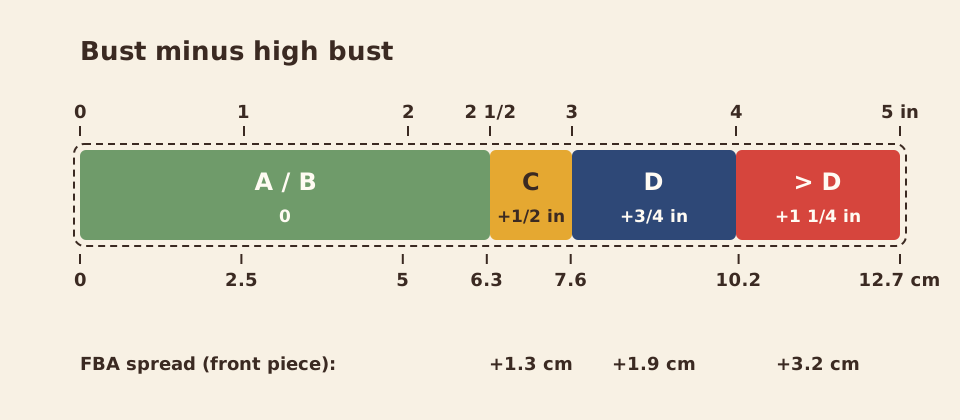
The 1998 Big 4 fit brochure reads the difference as a pattern cup size and gives the spread for each:
| Bust minus high bust | Pattern cup | FBA: spread the front pattern piece by |
|---|---|---|
| Under 2 1/2 in (6.3 cm) | A or B | No adjustment |
| 2 1/2 to 3 in (6.3 to 7.6 cm) | C | 1/2 in (1.3 cm) |
| 3 1/2 to 4 in (8.9 to 10.2 cm) | D | 3/4 in (1.9 cm) |
| 4 in (10.2 cm) or more | Larger than D | 1 1/4 in (3.2 cm) |
The brochure leaves 3 to 3 1/2 in (7.6 to 8.9 cm) between bands. SewNQuilt reads it as D, which is the generous choice. Pattern cup sizes are not bra cup sizes, so do not read your bra label here.
Because the front pattern piece is half the front, the finished garment gains twice the spread across the bust.
Worked example (imperial)
Bust 37 1/2 in, high bust 34 in. Difference: 37 1/2 minus 34 = 3 1/2 in, a D. Choose by high bust: 34 in is a Big 4 Misses 14 (high bust 34 in, bust 36 in). Spread the front 3/4 in at the bust point: the bodice gains 2 x 3/4 = 1 1/2 in, and 36 + 1 1/2 = 37 1/2 in. That matches your bust exactly, with the pattern's own ease still on top.
Worked example (metric)
Bust 96 cm, high bust 87 cm. Difference: 9 cm, inside the D band. Choose by high bust: 87 cm is a Big 4 Misses 14 (high bust 87 cm, bust 92 cm). Spread the front 1.9 cm: the bodice gains 2 x 1.9 = 3.8 cm, so 92 + 3.8 = 95.8 cm, within 0.2 cm of your 96 cm.
And for contrast: bust 34 in (87 cm), high bust 32 in (82 cm). The difference is 2 in (5 cm), under the line, so you choose by bust: Misses 12, no FBA.
How to measure hips for sewing
The hip is the fullest part of the seat, not the hip bones. Stand with your feet together (feet apart shrinks the reading), look at yourself side on in the mirror and find the level where your bottom sticks out most. For most adults that is 7 to 9 in (18 to 23 cm) below the natural waist, a range Simplicity prints on its chart.
Wrap the tape level all round at that point, then measure straight down from the waist elastic to the tape and write that depth next to the girth. Pattern pieces mark the hip line at a fixed depth; your own depth tells you whether to move it.
If your thighs are fuller than your seat, use the thigh level girth as your hip. Trousers have to pass over the widest point, wherever it is.
The high hip, about 3 to 4 in (7.5 to 10 cm) below the waist at the hip bones, is the one for low rise waistbands and for a full tummy. Take both.
What is back waist length and how do I measure it?
Back waist length runs from the prominent bone at the base of the neck (the seventh cervical vertebra, C7, the one you feel when you bend your head forward) straight down the spine to the waist elastic. You cannot measure it on yourself, so ask a helper.
It tells you whether a bodice will sit at your waist or above it. The Big 4 Misses size 12 is drafted for 16 1/4 in (41.5 cm). The 1998 Big 4 brochure suggests petite patterns if your back waist length is 1 in (2.5 cm) or more shorter than your size's and you are under about 5 ft 5 in (165 cm). Misses Petite keeps the same girths with a shorter back: 15 1/4 in (39 cm) at size 12. Most patterns also print lengthen and shorten lines for exactly this adjustment.
Body measurement chart for sewing: how your numbers become a size
Use your measurements in this order:
- Tops, dresses, jackets, coats: bust, or high bust when the difference is more than 2 1/2 in (6.3 cm).
- Trousers and skirts fitted at the hip: hip.
- Skirts that are not fitted at the hip (full gathered skirts): waist.
- Men's tops: chest; shirts also by neck and sleeve length.
- Children: height first, then chest, waist and hip.
If bust, waist and hip fall in different sizes, that is normal. Multi size patterns let you blend from one size line to the next at bust, waist and hip. The sewing pattern size chart guide shows the full charts and how to grade between sizes.
Measuring children
Children grow in height first, so European and OTTOBRE children's sizes are named by height in centimetres: size 104 is for a child about 104 cm tall, and the sizes step by 6 cm (98, 104, 110 and so on). US patterns use age style numbers (toddler 1/2 to 4, children 2 to 8, girls and boys 7 to 16), each with its own measurement chart.
- Babies: measure height lying down. Lay the baby on a flat surface, place one book at the crown and one at the soles of the feet, and measure between the books (the OTTOBRE method). Measure over a nappy (diaper).
- Toddlers and children: choose the size by height first, then check chest, waist and hip. OTTOBRE suggests adjusting when a measurement differs from the chart by more than 1 to 2 cm (about 3/8 to 3/4 in).
- The waist: many young children have no defined waist. Tie the elastic around the middle at about navel level and measure there.
- Back length: take nape to waist for dresses. For reference, OTTOBRE size 104 lists 25 cm (about 9 7/8 in), and Simplicity's children's size 4 lists 9 1/2 in (24 cm).
Make it quick and fun: measure while they watch a favourite show, and do the girths first while they are still patient.
Measuring pets for dog coats and cat jumpers
There is no ISO, EN, ASTM or JIS standard for pet clothing sizes, so pet sizing follows established pet apparel practice (Barbour and Ardmoor publish clear guides). Pet size bands are indicative only. Measure your own animal every time.
- Neck: around the base of the neck, where the collar sits. Leave room for two fingers under the tape, about 1 in (2.5 cm) for small and medium dogs.
- Chest girth: around the widest part of the rib cage, just behind the front legs. This is the key fit measurement for harnesses and for coats that close under the body.
- Back length: from the base of the neck (collar position) to the base of the tail. Most coat patterns are sized by back length.
- Also useful: waist girth in front of the hind legs (for belly straps), and the spacing between the front legs for coats with leg holes.
Deep chested breeds such as greyhounds and whippets need breed specific patterns. For a sense of scale, the Simply Sewing small dog coat example uses a 38 cm (15 in) neck. A treat in your pocket and a helper to steady the dog work wonders.
How often should I remeasure?
- Adults: every 6 months, as the Big 4 brochure advises, and before any fitted project such as trousers, a jacket or a wedding outfit.
- Children: every 3 months. They grow faster than your fabric stash.
- Pets: before each new coat, and after a seasonal coat change or weight change.
Keep the old records. Seeing that your back waist length never changes but your hip moved 1 in (2.5 cm) tells you which alterations to keep on your favourite pattern.
Your printable measurement record
Print this table, or copy it into your sewing notebook. Fill in one unit, or both.
| Measurement | in | cm | Date | Notes (what I wore, depth below waist) |
|---|---|---|---|---|
| Height | ||||
| High bust | ||||
| Bust | ||||
| Bust minus high bust | ||||
| Underbust | ||||
| Waist | ||||
| High hip | ||||
| Hip | ||||
| Back waist length | ||||
| Front waist length | ||||
| Shoulder to bust point | ||||
| Bust point span | ||||
| Shoulder length | ||||
| Across back | ||||
| Neck base | ||||
| Upper arm | ||||
| Arm length | ||||
| Wrist | ||||
| Crotch depth (seated) | ||||
| Total crotch length | ||||
| Inside leg | ||||
| Outside leg | ||||
| Thigh | ||||
| Head |
Mistakes and fixes
| Mistake | What happens | Fix |
|---|---|---|
| Choosing by your ready to wear size | The garment is one or more sizes off | Choose by body measurement and the pattern's chart |
| Measuring over clothes | Every girth reads large and the shape is hidden | Measure over underwear only |
| Tape dipping at the back | Bust and hip read too large | Check in a mirror; keep the tape level |
| Holding your breath or tummy in | The waist fits only while you hold it | Breathe normally and relax |
| Feet apart for the hip | Hip reads small, trousers pull across the seat | Stand with feet together |
| Calling the jeans waistband your waist | Bodices end too low | Use the elastic at the natural waist; record high hip separately |
| Picking tops by bust with a full bust | Gaping neckline, wide shoulders | Choose by high bust and do an FBA |
| Measuring your own back waist length | The tape wanders off the spine | Ask a helper |
| An old, stretched tape | Everything reads short | Check the tape against a ruler yearly |
| No date on the record | You cannot tell which numbers are current | Date every set |
Let SewNQuilt keep your measurements
Your tape measure has done its job. Now let SewNQuilt remember the numbers. In Studio you keep measurement profiles for yourself, your family and your pets, with a guided measuring guide that takes you through a quick set or the full set of measuring points. Inchy, our inchworm, walks you through each one, in inches or centimetres, whichever you like.
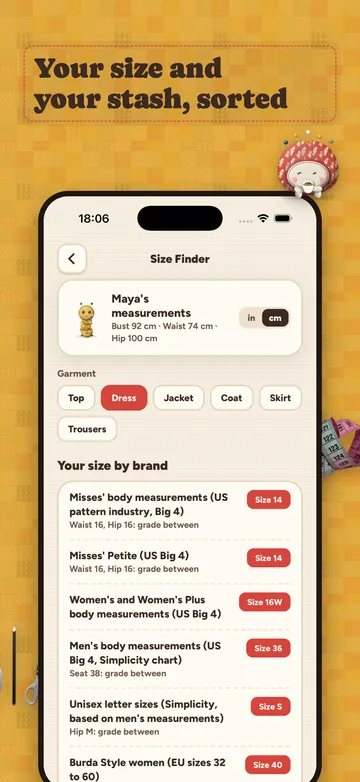
Then the fun part. Size Finder reads your profile against each pattern company's chart, Big 4 Misses, Petite, Women's, Men's, Burda and more, and tells you your size by brand. Ask Pip knows your measurements too, so "will this fit me?" gets a real answer.
SewNQuilt Pro comes with weekly, monthly or yearly plans ($49.99 a year in the US). Get SewNQuilt and measure once, sew in your size every time.
FAQ
How do I measure myself for sewing patterns without a helper?
You can take every girth alone: bust, high bust, waist, hip, arms and legs, using a mirror to keep the tape level. Back waist length, across back and shoulder length really need a second pair of hands, because the tape has to follow your spine. If you are on your own, take the girths today and ask someone for the back lengths later; they rarely change.
Where exactly is the high bust measured?
Right up under the arms, above the fullest part of the bust at the front, and straight across the shoulder blades at the back. The tape may angle up a little at the front. It should not touch breast tissue.
How far below the waist is the hip measured?
At the fullest part of the seat, which for most adults is 7 to 9 in (18 to 23 cm) below the natural waist. Find it in a mirror from the side rather than by a fixed number, and write down the depth so you can move the hip line on the pattern if needed.
Should I measure over clothes?
No. Measure over the underwear you normally wear, with the bra you plan to wear under the garment. Clothes add bulk and hide your real shape, and the pattern already adds ease for movement.
Do I need a full bust adjustment?
Subtract your high bust from your bust. If the difference is more than 2 1/2 in (6.3 cm), choose your size by high bust and add an FBA: spread the front pattern 1/2 in (1.3 cm) for a C cup, 3/4 in (1.9 cm) for a D and 1 1/4 in (3.2 cm) for larger than D. If it is 2 1/2 in or less, the Misses B cup draft suits you as it is.
What if my measurements fall in different sizes?
That is the norm, not the exception. Choose the size for the most important area of the garment (bust for tops, hip for trousers), then blend between the size lines at waist and hip on a multi size pattern.
How should I measure a child who will not stand still?
Measure babies lying down between two books for height. For toddlers, take height against a wall first, since EU and OTTOBRE sizes are chosen by height, then chest, waist and hip. Five quick measurements beat twenty rushed ones.
Is there a standard for measuring dogs?
No ISO, EN, ASTM or JIS standard covers pet garments. Measure neck, chest girth just behind the front legs and back length from the base of the neck to the base of the tail, and treat any size chart as a guide.
Related guides
- Sewing pattern size chart: Big 4, Burda and OTTOBRE comparedRead the guide
- How much fabric do I need?Read the guide
- Seam allowance guideRead the guide
- Sewing for beginners: your first weekRead the guide
- Sewing machine needle size chartRead the guide
- Free toolssewing and quilting calculatorsOpen the tool
Sources
All checked 31 October 2026.
- ISO 8559-1:2017, Size designation of clothes, Part 1: Anthropometric definitions for body measurement. ISO. https://www.iso.org/standard/61686.html
- ISO 8559-2:2025, Size designation of clothes, Part 2: Primary and secondary dimension indicators. ISO. https://www.iso.org/standard/85590.html
- EN 13402-3, Size designation of clothes, Part 3: Measurements and intervals. CEN (iTeh catalogue). https://iteh.eu/catalog/standards/cen/75aa24eb-beef-417a-8010-5bf9fce5c968/en-13402-3-2004
- ASTM Subcommittee D13.55 on Body Measurements for Apparel Sizing, jurisdiction list (includes D5219 terminology and the US body measurement tables). ASTM International. https://www.astm.org/membership-participation/technical-committees/committee-d13/subcommittee-d13/jurisdiction-d1355
- Do You Really Know Your Pattern Size? Simplicity, McCall's, Vogue and Butterick fit brochure (1998), hosted by Threads. https://images.threadsmagazine.com/app/uploads/2008/10/11135606/fitbroch.pdf
- Simplicity size charts and measurement guide. Simplicity. https://simplicity.com/size-charts/
- Pattern Sizing and Body Measurements, McCall Pattern Company and Simplicity Creative Group (PDF). https://www.hobbycraft.co.uk/on/demandware.static/-/Library-Sites-hobbycraft-uk-content/default/images/brand/simplicity/hobbycraft_simplicity_measurement_chart.pdf
- OTTOBRE design size charts and measuring. OTTOBRE design. https://www.ottobredesign.com/pages/size-charts
- How to measure a dog for a coat. Barbour. https://www.barbour.com/gb/blog/barbour-dogs/how-to-measure-for-a-dog-coat.html
- Dog coat size guide. Ardmoor. https://www.ardmoor.co.uk/blogs/news/dog-coat-size-guide
- Easy dog coat pattern. Simply Sewing. https://simplysewingmag.com/sewing-patterns/easy-dog-coat-pattern
Image credits
- Dressmaker measuring a dress form: Michael Burrows on Pexels, https://www.pexels.com/photo/crop-seamstress-measuring-chest-of-mannequin-with-tape-in-studio-7147594/ (ID 7147594), Pexels License.
- Drawings: the SewNQuilt drawing engine.
- Chart: SewNQuilt, from the 1998 Big 4 fit brochure values.
- Screenshot: the SewNQuilt app.